Friday, 1 September 2023

New Towel for Swimming


Three 'foot' towels

Several years ago I wove a towel for my husband to take when he goes swimming.  I used a black weft for the beginning and end of the towel with a light green weft for the centre section. After weekly use for three years the towel started to fray at the selvedges and one hem started to wear.  Cottolin makes an amazingly sturdy fabric but I needed to weave him a new towel. 

The centre of the old towel was not obviously worn. I thought that I would cut down the old towel into three section and hem them all round.  This made three small foot towels for standing on when in the changing room at the swimming baths.

I like the pattern.


I used two shafts for the border selvedge on the first towel. .This time I did not use a them.  The final 2 warp ends were threaded into the same heddle. I did not use a floating selvedge. I only used eight  shafts in all. 

Warp: cottolin in 3 shades of blue ( dark blue, medium blue and light blue) and beige

Weft: beige cottolin 

Sett; 30 epi  10 reed three ends per dent

Pattern repeat is 14 warp ends. 

Border: 4 diagonals Two ends in last heddle. 38 ends in beige.

13 groups stripes

beige border dk blue, light blue, dk blue, med blue.dk blue, beige centre stripe dk blue then reverse colour order finishing with another beige border

Each stripe is 56 ends apart from the border sections. However, you will see from the close up of the finished towel that I made a mistake when making the warp. One of the dark blue stripes did not have enough warp ends. I was annoyed that I did not notice this at the time. It is so easy to make this type of error when making a wide warp. 

Width at reed is 26.25 inches

The towel on the loom


The finished towel


Close up of the front and reverse showing the narrower dark blue stripe


Close up of the pattern.


September 2023

Susan J Foulkes

Tuesday, 1 August 2023

Collapse Weave two

A new design which is to be dyed.

Weave structure: Plain weave

Warp and weft: 2/20 silk and an overtwisted wool yarn.

Overtwisted yarn can be tricky to put onto a loom.  Once the ends are cut, the overtwist can start to run out of the yarn. At each stage I tie the groups of threads together. This keeps the overtwist in the yarn.


Winding on 


Threading through the reed
Once I have threaded the ends through the reed I  tie them loosely onto the front beam.


A close up of the weaving.

This weave is loosely woven.  The weft alternates - two picks of wool to two picks of silk.  The wool is carefully tapped into place so that there is a gap between the picks. The first silk pick is tapped into place leaving the same gap as between the two wool picks.  The second silk pick is tapped into place so that it touches the first silk pick. This could be described as cramming and spacing. 


First sample

Reed 12 reed with one end per dent for the wool and two ends per dent for the 20/2silk

Width at reed:   28 inches   77 cm
                                                                           

Off Loom before washing    
Width         26 inches               
Length         11.5 inches   cm                      

After washing                
Width    approx           14.5 inches              
Length    approx      8.25 inches      20.5 cm


After washing I examined the sample carefully.  I would have liked the weave to be slightly closer together after washing so I thought that I would alter the sett and weave a second sample. 


First sample after washing and the second sample on the loom. 


Second sample

Reed 8 reed with one end per dent for the wool and two ends per dent for the 2/2- silk

Width at reed  25 inches  63.5 cm
                                                                                                 
Off Loom 
before washing              
  Width     23.5 inches  59 cm      
 length     7.75 inches  19.5 cm                      

After washing  
Width  approx   12 inches  30 cms
Length  approx    5 inches  13 cm       

I decided that the second sample was better so I used this sett for the final scarf.  

Long scarf


8 reed threading 1 1 2 (silk)

Before washing
Width at reed  23.5 inches   59 cm
Length before washing  119.5 inches  302 cm 

After washing
width  approx   12.5 inches    32 cm
length approx     81 inches    206 cms

The finished scarf has a lovely soft feel and a beautiful texture.  It has 'bounce' because of the collapse weave structure. This makes it difficult to measure exactly.  The fringe at each end has to be knotted as soon as it is off the loom. 


Completed scarf before dyeing


Closeup of texture

I am intending to dye this scarf. I am afraid that it has to added to the list of things to do! My pile of UFO's (unfinished projects) is growing longer by the week.


Susan J Foulkes
August 2023

Saturday, 1 July 2023

The Great Tapestry of Scotland

Recently I visited my favourite town, Melrose in the Borders region of Scotland. We enjoyed several days walking in the beautiful countryside. 

In Galashiels, a new visitors centre and Gallery has opened. It was built to house the Great Tapestry of Scotland. It is an 'artwork for the nation by the nation.' 

 https://en.wikipedia.org/wiki/Great_Tapestry_of_Scotland

The Gallery  in Galashiels

The author, Alexander McCall Smith had the idea and he gathered a team to bring his vision to reality. One thousand volunteer stitchers from around Scotland were engaged by this vision to bring the Tapestry to life.  Each small group had their own stories to tell of the pleasures, difficulties, excitement and joy they experienced during the making. 

The Tapestry was finished in 2013 and was first exhibited in the Scottish Parliament building in Edinburgh. It toured Scotland regions so that everyone could get to see it.  

The stairway to the gallery

The whole Tapestry consists of 160 panels and is displayed in the first floor.  The stairway to the gallery has this lovely art work Threads by Andrew Crummy, Threads, which contains the name of everyone who was involved in the creation of the Tapestry..


The entrance showing the stunning roof.


One section of the gallery

The stories in the Tapestry start with the Ice Age in Scotland and end with the opening of the Scottish parliament in 1999. There are seven zones which each cover a period of  history. 

Here are a few of the tapestries. 

The Rosslyn Chapel


Sheep shearing


Shetland, the Ibister sisters.

Spinning and weaving


The paisley pattern stitched in Glasgow by 3 plus 3


My blog cannot do justice to the beauty and variety of the panels.  If you visit Scotland - do go and see it. 

After touring Scotland, it was given a permanent home here in Galashiels in 2021 . https://www.greattapestryofscotland.com/

Susan J Foulkes  July 2023


Thursday, 1 June 2023

Handtowels in Satin Weave

 Satin weave


I have just finished two handtowels in 10 shaft satin.  


Warp for both towels.

Warp: 16/2 unbleached cotton
Weft: 16/1 linen
Sett:19.5 ends per cm approx 48 ends per inch

I used a 16 reed with 3 ends per dent.

Total number of warp ends = 864
Width in reed =  approx 18 inches
Border: block 1 = 82, block 2 = 35, block 1 = 50 then block 2 = 35 ends.  
Border total = 202 at each side. 
Centre of towel has 460 ends. block 1.


Pattern one
Weft = red 16/1 linen


For this towel, I increased length of the of coloured stripes by 5 picks each time.
So the first stripe repeat of 5 picks was woven 3 times
The second repeat of 10 picks was woven 4 times
The third repeat of 15 picks was woven 5 times.
The next repeat of 20 picks was woven 7 times.
The pattern was then reversed to the end of the towel.


Red towel off the loom


Reverse face of red towel


Pattern two

Weft = blue 16/1 linen


For this blue towel I increased the number of pattern repeats for each stripe. The first pattern repeat is 5 blue picks on the surface and five picks where white predominates on the surface. 

The first stripes of 5 picks was woven 13 times. 
The second stripes of 10 picks was woven 7 times. 
The third stripes of 15 picks was woven 6 times. 
The fourth stripes of 20 picks was woven 5 times.  
The fifth stripes of 25 picks was woven 4 times. 
The sixth stripes of 30 picks was woven 3 times. 
The final stripes of 35 picks to end the towel was woven once.

For this version, I varied the length of each block as I was weaving.  

Blue towel off the loom 


Reverse face of blue towel


Here are the two woven towels before being hemmed. 


Two towels off the loom. 


I enjoyed trying to vary the pattern by the length of the horizontal stripes.  These are very sturdy handtowels.  I have to weave some matching hanging tags but I have another project on my band loom at the moment. 

June 2023

Susan J Foulkes

Monday, 1 May 2023

Weaving a tubular cord on an inkle loom and with a weaving disc.

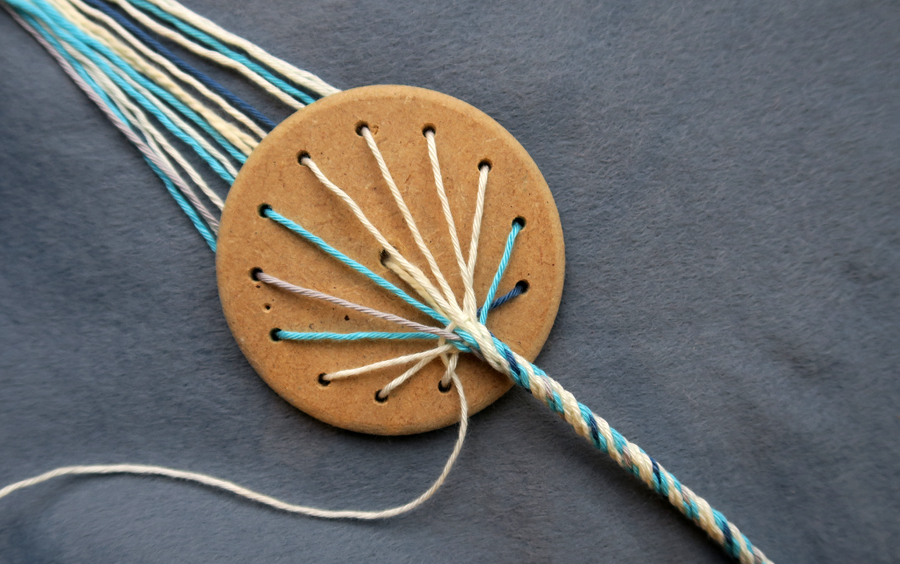
Weaving a filled tubular cord with a weaving disc. 


 This blog accompanies two articles in the Journal for Weavers, Spinners and Dyers.   https://journalwsd.org.uk/

Journal for Weavers, Spinners and Dyers, 285 Spring 2023  A Weaving Disc - an exploration of history and uses. Part 1,  and 285 2023, Summer, A Weaving Disc - part 2. 

What is disc weaving?

I have been exploring a little known weaving implement: a weaving disc. The disc seems to have originated in Indonesia but also appears in Lithuania and Russia.  

These weaving discs are be made with a odd number of holes around the edge and a central hole for the filling material. I have used discs with 13, 15, 19, 21 and 25 holes.

A filled tubular cord can be woven using a disc with a circular arrangement of holes and a central hole for the core thread. It produces a cord with a firm structure and the angle of twist can be altered whilst weaving. 
 
However a tubular cord can also be woven on an inkle loom. It is useful to examine this type tubular cord before examining the filled tubular cord. 


Weaving a tubular cord on an inkle loom


 Inkle Loom.

Weave drawdown for 13 threads

There are thirteen warp ends alternately threaded across the loom either through a heddle or over the top of the bar. There are two sheds so the weave structure is plain weave. The weft pulls the warp threads close together so the band itself is warp faced plain weave. The warp threads are in a single horizontal layer across the inkle loom. 

Weaving a flat band

The band loom cord was first woven as a flat band. The shuttle was entered first from one side then the shed was changed and the shuttle entered from the other side. 


Weaving a tubular band

To weave a tubular cord the weft was continually entered from the same side and pulled tight. This pulls the flat band around on itself so that the tube is formed. 

The twist in the pattern occurs because the weft spirals whilst weaving even though the warp threads are in a horizontal line. This twist is permanent and cannot be varied.


Weaving a filled tubular cord with a weaving disc. 

What is disc weaving?

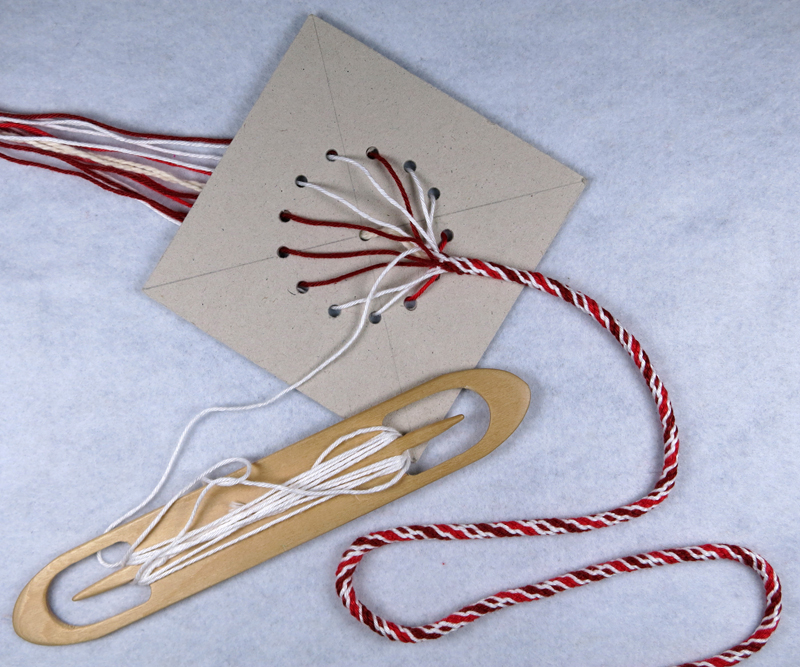
With the warp ends arranged in a circle and a central core thread, a patterned cord can be woven in warp-faced plain weave. The weft is not visible as the warp ends are pulled tightly together. The central core thread makes the cord strong. 

The weft is entered from the same side for the whole of the weaving. The disc is rotated. This means that unlike other weaving methods, the warp is not in a static horizontal plane but moves around as the weft is entered. 

As there are no books about this technique I had to experiment to find out the most efficient and effective way of weaving.  I discovered that the disc itself does not need to be circular. It is the pattern of holes that need to be arranged in a circle. 


A disc with 13 holes and a central hole


A cardboard square with 13 warp holes
 

Visualising the spiral pattern. 

The  SeiZenn - Band Weaving Pattern Editor. This is an amazing resource. This can be found at: 

  https://www.raktres.net/seizenn/#/

The software now includes a disc option which you can access from the home page. Here is a quick link. 

https://www.raktres.net/seizenn/#/disk  This means that you can design a pattern for your tubular cord using this software.  It is a great addition to a weavers box of tools.

Here is a 13 thread pattern using this software. 


Here is the same 13 warp thread pattern as shown in the drawdown for the inkle loom but here you can see it as a spiral woven tube. 


close up of the filled tubular cord.

I also made a YouTube video to accompany the two articles :  Disc Weaving: making a tubular filled cord 

  https://youtu.be/W7miDg2bix4

The video demonstrates how to start weaving; how to find the point of weaving and how to weave. The thickness of the core threads alters the feel and flexibility of the cord. 

These  cords are flexible and have many uses. They can be made in a variety of threads: cotton, silk, wool and with a variety of core materials.  I have woven cotton cords with raffia, jute and rattan as the core thread.


Susan J Foulkes May 2023


Saturday, 1 April 2023

Designing from architecture: the Casa Batlló, Barcelona Part Two

Course Work; a valuable resource. 

 I was fascinated by the buildings by Gaudi, in particular the Casa Batlló in Barcelona. The outside of the building is wonderful but the staircase inside is a lovely exercise in  the use of shading. 

Robert Hughes says that 'Under the skylight where they take the most light, the skin of the internal walls is flat, a cobalt blue. The walls get lighter in colour and develop a ripple of texture (to catch the light falling from above) as they descend from floor to floor. They pass from cobalt to sky blue, and thence to pearly grey, before becoming white at street level for maximum reflection.'

Roberto Hughes Barcelona (1992) p 512. This is my picture of the internal stairwell.  


I was fascinated by the way in which Gaudi had used shading to bring the light down into the stairwell. The tiles shaded upwards so that the top of the stairwell is darker blue and resembles the sky when looking up.  The bottom of the stairwell is white to reflect the light. Nowadays you can go on a virtual tour. This is amazing and you get to see so many areas of the building which were not open to the public when I went. 

https://www.casabatllo.es/en/virtual-tour/

The remit from the HNC course was to design materials for a range of purposes. Here are some of my samples inspired by the stairwell tiles.

Weave structure: Monks belt - for a cushion cover.

This is an interesting structure with regular floats on a plain weave background. 

Weave draft Monks Belt


The woven sample

Weave structure: Boulevard weave - for a cushion cover


Weave draft for Boulevard weave.

For the weave draft, I used different colours to show up the weave structure. For the actual design I used five shades of blue 16/2 cotton. 

Boulevard weave


Weave structure:   Inlay

Inlay

reverse of inlay sample

Some of the entries in my sketch book.


Weave structure:   Double weave 1  cushion covers.

I used 16/2 cotton at 32 epi for both layers. The weft is 5 shades of blue 16/2 cotton. 


I have used this design for cushion covers for my living room. 


Double weave 2

Once double weave is set up on the loom, the weaving can be varied.  I tried to shade the colours and to change the length of the coloured pattern on the surface.  It gives a pleasing effect.  


I hope that you have enjoyed looking at these old samples.  They may be old but are a rich source of inspiration for me particularly as I had not viewed them for some time.

Happy weaving

Susan J Foulkes 2023