I am running an online workshop for the Braid Society on Braids & Bands group
https://groups.io/g/braidsandbands This blog is part of the workshop for week one.
The Woolery in the USA, has published a post about the workshop
https://woolery.com/blog/ If you live in the USA, their online shop is open for equipment etc.
I love band weaving. The back strap is such a practical way to weave and very portable. I also love weaving equipment, from the simple to the more highly decorated. I have quite a collection and very often have more than one is use.
My one regret is that I have not found a Sami heddle made from reindeer antler. On my recent rip to Jokkmokk, I saw a lovely heddle in an exhibition in the Sami Douji Centre but it was bought as soon as the exhibition opened. The person waited in the queue to get in, and immediately purchased it. Here is a picture of the heddle and the person who made it. It was a work of art and takes a skill learned over a considerable period and many months to make.
 |
| Heddle and maker |
Owning something is not really the point. Owning something that has been made with considerable skill and that I can use, adds another dimension to weaving. I love my large loom and find myself stroking the wood sometimes. It is the feel of the object. Handmade heddles are such a joy to use. I feel that I am in touch with the maker as well as in touch with the skills that I need to weave. In Scandinavian countries a decorated rigid heddle was often given as a betrothal gift and there are some beautiful examples in museums.
Here are some of my standard rigid heddles.
 |
| Estonian Heddle and shuttle |
Here are some of my standard heddles currently in use. I bought a set of beautiful heddles in Boras, Sweden many years ago and they are simply lovely to hold. They still sell some of the designs.
 |
| The two heddles on the right are from vavkompaniet. |
My first workshop online was a number of years ago. At the time, rigid heddles were not easy to find. I tried making my own and shared the process. Nowadays,heddles are widely available and with the advent of 3D printing and an interest in making weaving tools, you do not have to acquire new skills to start weaving.
Here are the series of pictures I posted. I am not a wood worker, so carpenters look away now! These heddles were not works of art but I enjoyed the process of working out how to make something within the severe limits of my skill.
Making a rigid heddle
1. You will need: wooden coffee stirrers, glue, fine sand paper, wire wool, a drill. And a length of wood, approx 24 mm in depth. This should be flat one side but may be shaped on the other.
Choose coffee stirrers that are straight and not warped. Sand them to ensure that they are completely smooth. Mark the centre and drill a small hole in each stick.
2. Sand them again and finish with wire wool. Make sure that the sides of the sticks are smooth. You will need more stirrers than you eventually use for the heddle. Some will splinter or split. In others, you may find that your drilled hole is not central.
3. Cut four 24 sticks the length of one coffee stirrer. These will form the top and bottom of the heddle. Take two coffee stirrers and glue them to two of the wide sticks on the long edge. Leave until the glue is dry.
Now spread glue on the wide sticks and place one coffee stirrer at each end.
4. Start to place the rest of the narrow sticks into place. Adjust the gap between each stick. Make the gaps as even as possible.
5. Glue the other two wide sticks. Stick them on top of the narrow sticks. Place a weight on the completed heddle and leave the glue to dry.
6. You will need to sand the top and bottom of the heddle.
The heddle is now complete. Usually, heddles have a handle on the bottom edge. This helps to balance the heddle when weaving. You can attach a small weight to the middle of the heddle on the bottom edge which should stop it twisting.
I made a number of heddles and gave them away, but I kept this one for myself. It is still in use.
 |
| Another home made standard heddle |
I also tried to make my own band lock.
Making a Band Lock
You will need:
20 x 24mm wood no longer than 140mm
2 cup hooks
A thin strip of wood narrower than the first
A belt
I made a number of versions. This one uses a square section length of wood.
Another system is using a cotton reel and a ‘clip it’ with a cord to go around your waist.
Using a band lock
Band locks are not new. They have been found in Etruscan graves. They were made of bronze. Two identical strips with a hook on each end hold the warp ends in place. The back strap was tied around this band lock to clamp the warp ends tightly. I tried to find a blacksmith to make me a copy but I was unsuccessful.
This is from an illustration in an article by Margarita Gleba. However, there is no indication that they used the band lock in this way. They may have woven in the opposite direction. If the tablets are near to the band lock, you can weave over the tablets and beat away from you. This means that any overtwist in the warp ends can be easily undone by the weaver as the unwoven warp ends are wrapped around and through the band lock.
This band lock uses a slightly rounded length of wood.
When you tension the warp, the band locks into place.
Week One of the workshop for the Braid Society, gives examples of woven bands from northern Europe, South America and Japan. Remember you can use an inkle loom or a two shaft table or floor loom. You do not have to use a standard heddle.
A Striped Band
Here is a band inspired by a patterned band from Peru.
This is another beautiful Swedish heddle.
 |
Close up of band.
|
Warp Chart
Blue 6 6
Dk green 2
Medium green 2
Emerald green 2
Yellow 1
White 1
Light pink 2
Medium pink 2
Bright pink 2
Burgundy 1
There are 27 warp ends in total. I used 4 ply sock yarn and the band width is 15mm. I love the way that the colours glow against the dark blue edges.
Here is the drawdown with the nine colours.
 |
| Nine colour Peruvian band |
I hope you enjoy trying this band. It is a great way to use up small quantities of yarn.
I have been making some book marks with an adapted pattern but this time using 16/2 cotton.
Using a different yarn will alter the width of the band. i will be showing you the bookmarks and the revised pattern on another blog.
Of course other equipment can be used. I am weaving a red and white band for a belt on my floor inkle loom.
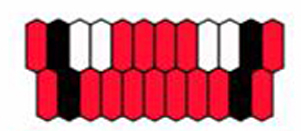
I am using double knit cotton two colours with a red weft.
Warp Chart
red 11 1 1 2 1 1 2 1 1 12
white 1 2 1 1 2 1 1 2 1
Here is the draw down. There are 45 warp ends in total. The width of the band on the loom is 3 cms 1.25 inches.
Here is another way of displaying the band pattern. We will be looking at this in a later blog.
Next week there will more patterns for you to try
Weaving equipment can be bought online from Stoorstalka who ship world-wide. They are also publishing the booklets for the online weaving workshop. I want to encourage as many people as possible to get weaving! Here is the link
https://shop.stoorstalka.com/en/products/workshop/
All the bands in the workshop can be woven using a standard rigid heddle with a band weaving shuttle.
Susan J Foulkes May 1st 2020