Saturday, 1 April 2017

Dressing To Impress: Chinese formal and informal costumes

Dressing to Impress

'Dressing to Impress': Chinese Formal and Informal Costume and Dress Accessories
(Qing Dynasty 1644 - 1911)

Lecture by David Rosier.

Wednesday 8th February 2017 at 7:30 organised by the Oriental Museum, Durham.


The Friends of the Oriental Museum organise a series of talks each year which are open to the public. https://www.dur.ac.uk/oriental.museum/

David Rosier lived for a many years in Hong Kong and worked extensively in China. During this time he and his wife became interested in the stunning imperial textiles that they saw and started to create an extensive collection of Court Costume predominately from the Qing Dynasty (1644-1911). His previous talk on Dragon Imagery in Chinese Imperial Textiles was colourful, informative and exciting.  I have a new appreciation of the range and purpose of the robes seen in many museums. 

His previous talk was described in my blog for December 2015 and you can quickly go it it with this link.  https://durhamweaver64.blogspot.co.uk/2015_12_01_archive.html

For the talk in February 2017, David showed us the many and varied clothing items worn by officials and the military and also described dress accessories. These ranged from elegant purses, spectacle cases and jewellery.  There were many examples of these textiles for us to see in detail.


My note taking skills have declined so I am doubly indebited to David for supplying these notes to accompany the pictures on this blog.  He is generous with his time and has a real love of these wonderful examples of Chinese costumes.

General costume


The informal costume items date from the 19th Century and would have been worn by men and women within the nobility (Imperial Clan) and the officials (and their wives) of the 9 Ranks of both Civil Officials (Mandarins) and 9 Ranks of Military Officials. In addition these items would also have been worn by those who would be regarded as being part of Chinese High Society (eminent scholars, wealthy landowners and merchants). 

The costumes worn, plus dress accessories, were not governed by the strict regulations applied to Court Costume and therefore the wearer could determine the design and iconography to be used. The items would be produced on commission by Commercial Workshops, as opposed to the Imperial Workshops, with designs either being the unique requirement of the wearer or taken from pattern books maintained by the workshop.

Whilst the majority of items originate from Commercial Workshops a few items (such as the Mirror Cover) are evidence of the skills of ladies of Chinese High Society. Embroidery was regarded as the 'premier feminine art form' and girls born into elite families would be trained in the art and expected to produce exceptional items. A prospective daughter-in-law would often produce a selection of such items to hopefully convince her future mother-in-law that she had the appropriate skills and was a suitable bride for her son. These items are generally unique in their design.


Civil Rank Badge:

This is a front badge for a 2nd Rank Civil Official. The central split indicates its position on a plain outer robe known as a Pu Fu-the badge on the back would be solid. The bird is a Golden Pheasant. The border symbols are alternating wishes for long life and happiness. Bats are an indication of happiness as are the Buddhist swastika design so they indicate in effect a wish for 'double happiness' The position of the sun symbol indicates this is a badge for a man - his wife would have had the sun in the opposite corner.


Badge for the front of a robe of a Civil Official.


I particularly liked the Golden Pheasant on the Civil Official’s rank badge.  It is embroidered in satin stitch with gold and silver couching.  It was made in Suzhou about 1870.  The bird is very lively with beautiful colours for the tail feathers and wings. I think that this will be a great source of inspiration for my a design for weaving.


Purses


Formal and informal robes had no pockets and any items required day to day for practical purposes were attached to a belt known as a Chao Dai. There were ceremonial and informal versions of the belts. Whilst there were a myriad of items created to be worn in this way purses were by far the most common articles. This was due in part to the tradition, from the Emperor downwards, to giving embroidered purses as a gift for Chinese/Lunar New Year.

Some were produced in the Imperial Workshops but the majority came from specialist Commercial Workshops and were either made from an existing pattern or a unique design was created at the request of the person commissioning the piece. These decorative accessories were most popular in 19th Century but some surviving examples date back to 18th Century but tended to be plainer in design/decoration. These items were 'unisex' and so it is impossible to tell if this was worn by a man or women. Unlike formal court costume these items were handed down the generations as were informal robes.

Purse 1: a coin purse.

Purse 1: this is a coin purse with a protective flap and the embroidery is suggestive of production in Canton. The embroidery is fine but the design is rather basic indicating this is a lower quality item made from an established pattern


Purse 2: a dalian purse.


Purse 2: this is known as a dalian purse. It hooks over the belt and has two separate compartments. This example combines a number of symbols associated with longevity such as the shou symbol, peony and lotus. The animal is a tiger (4th Rank Military animal) but also used as a protective symbol for young boys. David thinks that this may have been a birthday gift for a young boy and was probably made in Suzhou or Nanjing.

Purse 3 Tobacco or snuff purse

Purse 3: this is a tobacco or snuff purse shaped as a gourd. The size and design indicates that this is late 18th Century. The design has symbols of happiness and the tassels have the Buddhist everlasting knot design added. 


Ear Muffs:


These would have been produced for women living in Northern China where the winter climate is cold. They are embroidered with a selected design of an ancient landscape. There are remnants of the rabbit fur that would have lined the ear muffs. It probably dates to the mid 19th Century. 


Spectacle cases: 


These are for a man and a very common item worn from the belt. Women also had these cases but the glasses tended to be much smaller hence would have a much more delicate case. The bats are a symbol of happiness and hope for good fortune. The trellis background pattern is a decoration that had been used for many centuries but gave a 'modern'  or 'ageless' feel to the design. It is difficult to be specific on the date but it is probably from the 19th Century.


A case for spectacles.

Pocket Watch Cover:


Pocket watch cover


This is a spectacular piece from the late 19th Century given that the inner mauve lining indicates the use of aniline/artificial dyes which were not commercially available until 1890's in China. It may have been added later as the embroidery suggests an earlier production time.
The silk ground is in Imperial Yellow the colour reserved for Emperor/Empress so far as regulated court costume was concerned. Whilst this colour could be used by others for informal items it was rarely selected as a colour given its associations with the Emperor.


Because of the superb embroidery, David thinks that this may have been produced for the Emperor to give as a gift. The Peacock represents the 3rd Rank for a Civil Official but here it is a symbol associated with splendour and wealth. The peony and pine trees are other symbols associated with longevity.


Collar:

Collars were fully detachable and were worn by women and children. Men did not wear decorative collars - only a stiff reinforced plain collar with their informal robes (Long robe (Nei Tao), 3/4 length tunic top (Wei Tao) plus collar-the full outfit was called a Chang Fu.

Collars ranged from small to vast and there was a massive range of design elements. Collars were detachable so designs appropriate to the occasion could be worn. Collar design often was coordinated with sleeve panel and robe trim themes. The plants on this collar relate to specific months of the year. Each month had a plant allocated as did the seasons.

A collar for a child with embroidered flowering plants

This is exquisite.  The curving shapes of the panels and the elegant embroidery make it a beautiful piece for a child to wear.

Sleeve panels:

Sleeve panels in terms of design were as variable as the collars ranging from auspicious or religious designs, stories from classical literature to complete random selection of imagery. They were detachable and so worn only when the design was relevant to the occasion. They were often bought with a set of matching robe trim and a collar.

They were created by specialist workshops. In David's collection and his experience of examining these textiles, it is the only item that mixes Chinese and Western images. He suspects that these were made for the wife of an official in a trading port, probably Canton, who was involved with trade with foreigners. It is unlikely to have been created for a wife of Western Trader as these items would not have displayed anything other than Chinese decoration although there are always exception to the rule. The border design has no particular meaning-purely decorative.


Silk sleeve panels


Close up of one of the boats.  


Mirror Cover:

The mirror cover is almost certainly a unique item created by one of the ladies within an elite family. It dates from early 19th Century with different domestic scenes on both sides and an inner silk-lined section to protect the mirror whilst travelling.

The interesting aspect is that the creator has recycled some much older scraps of silk brocade. These appear to be from robes typical of the Ming Dynasty (1368-1644) and have been identified as 16th Century. Recycling of textiles has been prevalent with textiles for many centuries and continued into 20th Century following the collapse of Imperial Rule in 1911.  Items such as Rank Badges were turned into ladies evening bags, screens etc and sleeve panels/Robe trim created table coverings and similar. This was most prevalent 1920-1940 and were often bought by Westerners.


A mirror cover
The embroidery is exquisite. I love the scenes of everyday life around the edges.  The two central characters are playing the game of Go.

Jewelry 

The times that I found most interesting were the items of jewellery.  These are made with Kingfisher feathers.  These feathers were farmed and then the sections were glued into the metal framework ensuring that the adhesive did not discolour the outer feather.
hairpin

close up of another hair ornament. What delicate work!
Last year I visited Basel and there was a special exhibition in the museum.  They had a display of Chinese jewellery which the curator was eager to show me.  I think he said that it was made with peacock feathers but the uniform blue would seem more typical of the kingfisher. (David confirmed that these are made with Kingfisher feathers.)

 Here are some examples from Basel.  Some of the items were so delicately made that the ends of the flowers  or wings of the bird would tremble when worn.  This would add to the iridescence of the colour.


As usual, Davids talk  finished all too quickly.  The items he brought for us to see were spread over several tables.  Although we could not touch, it was lovely to be able to see these items so clearly.

Glass display cabinets in museums although vital, do make examining textiles very difficult. 


Porcelain flower and Kingfisher feathers


David sent me a photograph of another piece from his collection. This decoration is so delicate.It is a hair pin with a porcelain flower. 

I want to thank David again for being so generous as to supply most of these detailed notes about his collection and additional photographs.  I can recommend him as a speaker for any group interested in textiles, clothing and accessories of China. 

Contact details for David Rosier.


David can be contacted at drosier@yahoo.com to discuss a possible lecture or special interest day topic and the logistics associated with staging an event.


Here is a list of lectures:

Lectures of approximately 60 minutes cover a range of topics linked with Chinese Imperial Court Costume of Qing Dynasty (1644-1911).
The most popular lectures include:
• Chinese Imperial Court Insignia of Rank-‘Ultimate Power Dressing’
• Chinese Imperial Court Costume-‘A Journey through the Emperor’s Wardrobe’
• Dragon Imagery in Chinese Imperial Costume-‘Ruling from the Dragon Throne’
• Emperor Qianlong-Ultimate Renaissance Ruler and Fine Art Collector.
In addition David gives full and half day Special Interest/Study Days ( ‘Dressing the Emperor’s Court’) plus a double lecture session. All talks are illustrated with digital images plus a display of relevant textiles.

He lectures regularly to textile and costume organisations, historical societies, museums, universities, Chinese Cultural groups, The National Trust and Art Fund around UK and is an accredited lecturer for the National Association of Decorative and Fine Arts Societies (NADFAS). http://www.nadfas.org.uk/ which has 300 societies around UK and approaching 100,000 members.

There is a link to a lecture David gave for the Oriental Rug and Textiles Society. You can view his talk here. http://www.orientalrugandtextilesociety.org.uk/imperial-wardrobe-talk.php


Susan J Foulkes April 2017

Wednesday, 15 March 2017

Travels around the Baltic:St Petersburg


The Kunstkamera  (Museum of Anthropology and Ethnography) in St Petersburg, Russia


The Kunstkammer in February 2017 
We visited St Peterburg in February this year.  Having seen the city in the summer when it was very hot, we thought that it would be interesting to see the winter season. Yes, it was cold and it was the first time that I had seen a wide frozen river.

 The Kunstkamera (Museum of Anthropology and Ethnography) is one of the first museums in the world.  It was established by Peter the Great, an enlightened and intelligent monarch who started to collect curiosities. This was a fashionable educational pursuit at the time. The heart of the collection is still made up of exhibits collected during Peter's lifetime.  It houses over one million ethnographic, anthropological and archaeological artefacts. This beautiful building, on the right in the photograph, was built to house the collection and opened in 1734.

The web site is   http://www.kunstkamera.ru/en/

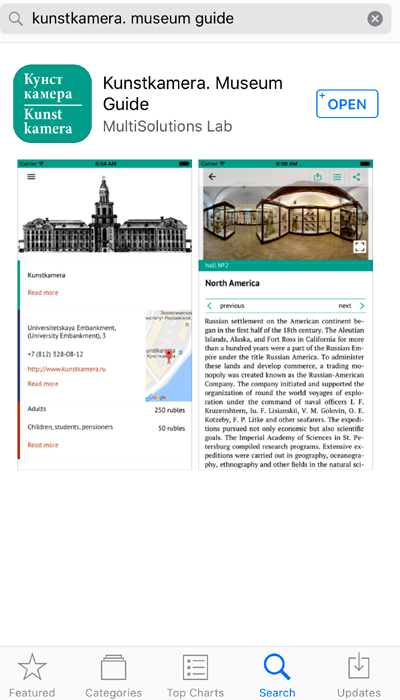
Mobile app.

The museum houses a wonderful collection of clothing and artefacts from many cultures.  The web site is good but the mobile app is wonderful. Going around the museum, I could upload information from QR points on the display cabinets. However, you do not need to go to the museum in person. You can browse the collection yourself by downloading this app for your  mobile phone.  It is free in the app store. There are lots of pictures and information about the exhibits.

The Kunstkamera Museum guide app. 

This app is very easy to use.


Start to browse by clicking on the museum guide.
One you have clicked onto the museum guide you can explore each floor of the museum.

Floor one. 
On each floor you can virtually walk around and click onto any of the numbered display cabinets. You can enlarge each floor so that the numbered cabinets appear.

There is plenty of information and pictures of the exhibits to see in detail. This picture shows Floor One, Hall 4, Japan and case 33. Clicking on the case brings up the information and pictures. It is about Kabuki and Noh theatre in Japan.

Inside the museum.


Here I am wandering around the museum.

Here are some of the amazing garments from 19th century Alaska.

Close up of the border from the Alaskan coat. 

The border on the coat is particularly attractive.


The cabinets displayed the garments and other artefacts clearly.  As you can see, many of the cases could be viewed from three sides which is very useful when examining textiles.


Here is a display of narrow band weaving from Africa. It is on Floor One, Hall 6 Africa,  case number 8 if you want to see it on the mobile app.  The textiles are gorgeous.

close up of textiles.

My interest was taken by a Manchurian costume. This can be seen on Floor Two, Hall 9 China, Mongolia and Korea in  case number 33 on the mobile app.


Costume from Manchuria with a woven belt.

This was the only belt on display which is similar to belts from countries in northern Europe in particular to those in the Ukraine, Russia, Belarus, Latvia and Lithuania.

The central area has a pattern with 11 pattern threads on a background of half basket weave.  There is a small pattern on either side which is a supplementary warp pattern on a background of warp faced plain weave. The fringe on the ends is used extensively in the Baltic area.  Was this an export item?

I consulted David Rosier who is an expert on Chinese textiles. He took me through the history of the Manchu. (See my next blog in April on Dressing to Impress).

As the Manchu took power in 1644 they had very clear ideas on the design of Court Costume but this was in terms of structure rather than designs/iconography. The Manchu adopted the Confucian based system of government and all the infrastructure that had existed in previous dynasties. As such they did little to change the iconography on costumes initially and this was adapted gradually up until 1759 when Emperor Qianlong undertook the most comprehensive review, revision and expansion of the costume regulations ever undertaken. This has not provided us with any specific design patterns attributed to this group.

However the Manchu evolved into traders in 16th and 17th century, in particular in fur and ginseng. They certainly had trade links with Russia. It may be that this belt was a commissioned piece. Of course, it may be an ethnic minority piece of China.   More information is needed. 
Thank you David, for your comments about this piece.


Close up of the ends of the belt. 


Weave pattern for 11 pattern threads.


Here is the weave pattern showing two of the motifs on the Manchurian belt with the cross pattern. There are 11 pattern threads. Each pattern is repeated twice with the cross motif in-between.  The whole belt was not visible but there were eight patterns on the front each repeated twice and separated by the cross pattern. It would be lovely to be able to see the whole belt. 
I have not had time to weave this pattern, but it is on my list of things to do.

Enjoy your virtual visit to the museum. 
In a later blog I will show items from my visit to the Museum of Ethnography in St Petersburg.  This is one of the largest museums of its type in the world and the collections are simply stunning. You can have a preview here.  http://eng.ethnomuseum.ru/

Peter the Great


The Bronze Horseman
This is the statue of Peter the Great in St Petersburg. it is known as The Bronze Horseman.


The Hermitage Museum - The General Staff Building.

We visited the Hermitage Museum which now has a modern annex in the General Staff Building. The internal spaces of the building have been creatively altered to make a stunning new set of exhibition rooms.

The new staircase leading up to the exhibition rooms.

The first exhibition space. 


Uniform of Peter the Great
In the Hermitage, there is a portrait of Peter the Great wearing his military uniform with his sash being worn around the waist. Amazingly the actual uniform which dates to before 1709 is on display with the military sash  near the original portrait.
Unfortunately I could not find out any further information about this uniform.
The sash interested me as I know that many military sashes are made using the sprang technique.  I looked carefully at the sash in display but could not see the details that might identify the technique. 


Close up of sash.  It appears to have been striped but the colours have faded.
During the International Conference of Braiding at Tacoma in July 2016, I went to a lecture by Carol James.  She told the story of how she made a replica of a sprang military sash which had belonged to George Washington. 

Carol has made a special study of military sashes made using the sprang technique. 

Technique    from this web address:


Her YouTube video How to Make a Sash using the Sprang Technique is excellent.

 https://www.youtube.com/watch?v=WoFMeGNshcM

Carol recreated the red silk sash which tradition states was given to George Washington by Major General Edward Braddock. She has written a very useful guide to identifying a sprang sash.  You can view the article here.

http://www.clothestellstories.com/index.php/sprang

Update

Unfortunately, I was unable to decide if the sash belonging to peter the Great was made by the sprang technique. However, Carol James has been in touch.

She sent me a photograph of a sash that she made which showed the S lean on the left and the Z lean on the right. This is diagnostic of the two-at-the-same-time work of sprang.

Take a closer look at the sash of Peter the Great.

close up of fringes of sash
Look at this close up of the two fringes on the sash.  Carol thinks that there is an  S lean to the stitches on one end of the sash and a Z lean on the other. This, in combination with the chain-link-fence type of structure is diagnostic of sprang.

She also thinks that there looks like several different qualities of thread have been used to compose the different stripes in the sash. The manner in which the holes stay open, it looks like a stiffer material, perhaps linen.

Many thanks Carol for your comments about this military sash.

Special Exhibition at the General Staff Building.

I was very fortunate to be visiting in February as the special exhibition in this annex was about Mariano Fortuny - the great designer of the 20th century, celebrated by his contemporaries as “The Magician of Venice.” The Fortuny fabrics, especially the Delphos dresses were stunning.

The light levels had to be kept low but here are two images taken from Pinterest and the Met.


The Delphos Dress by Fortuny

This dress and more can be seen on the Met web site at http://www.metmuseum.org/

The shimmering bronze outfit is at  http://www.metmuseum.org/art/collection/search/81594

Ever since I first saw one of these dresses in a museum many years ago, I have longed to wear one!

Happy weaving.

Susan J Foulkes  March 2017

Wednesday, 15 February 2017

Band Weaving and Record Keeping

The Importance of Record keeping


Record keeping may seem dull but it is invaluable.


Here is a page from one of my early record books for plain weave warp faced bands.

Keep a pattern drawdown and a small sample of the woven band.  It is easy to weave a short extra length to keep and they are really useful when designing bands in the future.
A few years ago, I found that I had so many record books and they were bulging.  I thought that I would digitise my records.

I started to scan the bands and save them with a JPEG of the drawdown.  I had to decide upon a standard format.  Adding in the materials used, the number of warp ends and the band width was important.

As my newly pristine records grew, I realised that I could put them all in a book. Here it is; The Art of Simple Band Weaving - colour and pattern. It was self published a few years ago by Blurb.com.


My book is in ebook format for IPad as well as print


Once I started to record my band patterns, I realised that it would be very useful to have some background information.  So the first chapter was written.  Then I thought about how I design new bands and so other sections were added.  In fact the book started to expand much further than my original idea.

Where once I had many bulging files, I now have a useful book on my shelf.  I use it when I am thinking about new bands for towel tags etc. It is a wonderful resource for me as well, I hope for others.

What sort of information is useful to record when weaving bands? 

Here are some ideas.


Warp details. The centre thread is in bold and indicated by M. This shows the colour order for making the warp and threading the heddle.

Grey      4
White        4
Green            1    1    1    1    1    1    1    1    1    1   1    1    1    1
Red                   1   1    1    1    1    1    1    1    1    1    1   1    1
                                                            M

Total number of warp ends: 43

Yarn for warp: 16/2 cotton in four colours used double.
Yarn for weft:  16/2 cotton in grey used double.

Width of woven band:  13 mm  approx 0.5 inches

If you have a programme for recording your weaving you can add the weave draft.

Weave Draft

Weave draft for narrow band.

Sample.


Always weave slightly too long a length for your project so that you can keep a sample.  This is invaluable. You do not have to keep neat samples.  If the beginning of the band is a bit wobbly as you find the correct tension, save that piece for your record book.

woven band sample

Try to keep records.  They are an invaluable resource for the future.


New Book on band weaving.


A new book on tape weaving has just been published by Schiffer Press.  The author, Susan Faulkner Weaver,  uses another way of recording band patterns.  Make your records to fit your own weaving needs.


This is a lovely informative book giving many traditional band patterns from the USA. 208 pages
Schiffer Press 2016  ISBN 978-0-7643-5196-9
Author: Susan Faulkner Weaver.


Susan J Foulkes  February 2017


Wednesday, 1 February 2017

Weaving in Ireland

I promised that I would do another blog about my trip to Ireland. My previous blog showed the start of my journey. Click here to read it. https://durhamweaver64.blogspot.co.uk/2016/10/handwoven-in-ireland.html

We stayed in Galway, an attractive and interesting city. It will be the European Capital of Culture in 2020. Having been to Liverpool in the UK  and Umea in Sweden when they were Capitals of Culture, I can recommend a visit in 2020 to Galway.  We hope to visit Aarhus in Denmark this year as they are the Capital of Culture in 2017.

The camp site site was in an idyllic spot overlooking Galway Bay.  We stayed for 6 days and the weather was mostly fine. One night there was a storm with 60 -70 mph winds coming straight towards us.  Fortunately our motor home is sturdy and so the movement in the wind was not too violent.

Overlooking Galway Bay - an idyllic view. 

We took a second trip to Inishmore from  Ros a' Mhíl.  The bus journey to the harbour was a good way to see the countryside and takes nearly an hour.  On the way we passed the entrance to Spiddel Craft Village.  Unfortunately the bus did not stop but it looks like a place to visit next time we go to Ireland.

Spiddel Craft Village from the bus.

Inishmore


The ferry to Inishmore was very efficient and it was a smooth journey.  I wanted to visit the craft shops to see if there were any criosanna for sale.  Kilmurvey Craft Village is another popular tourist stop. We cycled out to Kilmurvey and I visited every craft centre there but no-one had any crios for sale. There were only two outlets that said they would normally stock them but as it was the end of the season, they had none left.


Kilmurvey craft Village
The cycle ride was exciting and the leisurely pace meant that we could appreciate the beauty and the scenery of the island.

At Kilronen, there were a few craft shops but no-one here sold crios. However, there was a lovely selection of wool and of course plenty of Aran sweaters. We went for a long walk up to the black fort.

The famous Aran Sweater Market in Kilronen.


A colourful wall of wool.


Galway

However, Galway was lovely to explore and here I  found O'Maille on the High Street.  This is an absolute must to visit if you like traditional crafts of knitting, weaving and spinning.
Here is the web site.  https://www.omaille.com/

'Slow is Good'.

I had a long conversation with Anne Ó Máille, seen in my photograph.  Everything for sale in the shop is made in the traditional way. Yes, she did have some criosanna for sale which had been hand woven on Inis Oirr.

Anne Ó Máille holding the crios I bought.

She was a fountain of information and stories.  The Aran sweaters for sale in the shop are woven in a traditional way without a pattern.  Her supply of knitters who are skilled enough to weave like this is dwindling but their work is superb.

The shop has been established for some time.  This link gives further details about her knitters.
https://www.omaille.com/wild-geese-interview/

The photograph on the wall shows some of the cast and director of The Quiet Man, a film made on location at Ashford castle in 1951.  All the costumes were made of tweed supplied and tailored by the shop. (see the web site for further details).


close up of the photograph showing John Wayne
I bought a crios but also some lovely delicately coloured sock yarn  This was a relatively new line for the shop but she was keen to encourage quality Irish yarn. As Anne emphasized 'Slow is good'. She wanted to encourage quality goods made with care.

I bought a pack of four colours of sock weight yarn from mixed mountain fleece.   http://www.stwistwool.com/

I contacted the spinner about his wool as I wondered whether it would be suitable for weaving.

Diamuid was most helpful and told me a bit about the background to his company, S Twist Wool.

His introduction to the world of yarn started when he first learnt to weave after leaving school.  He spent a year in Stroud, Gloucestershire learning under a weaver there. His company,  S Twist Wool produces yarn for knitters.

The wool is collected from local farmers in the Kilkenny / Tipperary region and is washed using a natural fermentation method. This ensures that no harmful chemicals are used. All the washing is done by hand and the wool is dried in the open air.
Mindful of a carbon footprint, all of the natural dyes are gathered locally.  Making a decision about which dyes to use was made after extensive testing and hundreds of samples.  Finally, three local dyes were found which are fast enough to be offered. A lot of the experimentation centred around low-energy dyeing methods, such as solar and fermentation dyeing.

The colours of the sock yarn I bought are lovely and delicate. It was difficult to choose which colour pack to buy. I also bought a crios in the shop. When I got home I decided to weave my own design using this lovely coloured wool.


One skein has been wound ready for warp making.
It has been a long time since I wound yarn into balls from skeins.

The yarn is now ready for making the warp. 

I needed to weave a sample and make a warp long enough for a belt.  I was not sure how much yarn I would need, particularly as the white is used both for the warp and weft. Fortunately I had enough white to finish the belt.

Weave Chart


weave chart for the crios using four colours of wool.

The weave chart shows the colour order for threading. This chart is set up for two shafts and plain weave. I used 6 shafts to weave plain weave so that I could spread the warp to reduce the amount of friction on the warp ends.

There are 54 warp ends. I wove a short sample at 16 epi but the weave structure was too open.  The crios I bought is warp dominant.  I increased the sett to 20 epi and this made the woven fabric similar to the belt that I had purchased.

I wove the belt on my Louet table loom using six shafts.

weaving on the table loom.
The shuttle is on of my favourites and was hand made by Gunnar Karro. His shuttles and heddles are a real delight to handle.

close up of shuttle and fabric. 

Here is a picture of the finished belt.


It is 185 cm in length. The width is 6 cm  The crios that I bought in Galway is 175 cm in length and the width is 4.5 cm.
The wool is lovely to handle and I enjoyed the challenge of designing and weaving a belt.

There will be a further blog about Ireland in the future. There was so much to see, do and enjoy.


I have just finished a lovely book about the Aran Islands - it covers geology, archaeology, history, folklore, cartography, flora and fauna and history and more! It is Stones of Aran, Pilgrimage by Tim Robinson. He uses place names to recover stories of Aran in a discursive ramble around the perimeter of the island. It was first published in 1976 and I bought a second hand copy.


Happy weaving and happy reading.

Susan J Foulkes February 2017

Sunday, 15 January 2017

Hand towels on four shafts


Hardwearing Handtowels.


This weave is lovely and very useful as a hand towel. I do not know what it is called. The two pattern blocks are in a 2/1 twill with an additional pick. The warp is one colour - unbleached cotton - so the colour is only in the weft.  This means that if a long warp is put on the loom, several towels of different colours can be woven.


This is a block weave.  
There are three blocks to treadle.  The first is the border for the hem. The next two blocks alternate to form the pattern. This draft will not weave plain weave but the first treadling on weaves over two under one.  This is used for the hems of the towels.  Use a thin cotton such as 16/2 cotton in unbleached or white.

For the pattern there are two blocks. One block is threaded 12312312312 and the next block is threaded 43243243243.

As you can see with the two colours of weft, one block shows more of the coloured weft than the other.  This gives the appearance of checks. From these two blocks different patterns can be created.

Warp: 8/2 unbleached cotton
Weft; 8/2 unbleached cotton and 16/2 coloured cotton used double.
Sett: approx 20 epi
Picks approx 25 per inch.
For these towels I warped 460 ends. The width at the reed is 85 cm.

The pattern can be woven in stripes or checks.


on loom weaving with two shuttles.

Weaving Sequence


The border is the first pattern on the drawdown and is only used for the border. Weave about 4 cm with unbleached 16/2 cotton used singly.

The stripes are woven with 8/2 cotton used double.  Weave four picks with 8/2 doubled cotton in block two. weave four picks with double red 16/2 cotton in between then four picks with 8/2 cotton.
there are 20 picks in red before the next pattern.  I decided to weave three groups of two pattern blocks at each end of the towel.

For the centre of the towel, weave 30 cm then repeat the border pattern.  Finish with 13 cms in red then 4 cm in 16/2 cotton for the hem.


closeup of towel on loom
The hem is easy to turn under.  I used a zig zag stitch on my sewing machine.  The finer weft makes the hem less bulky.  I like the contrast with the white for the hem at each end of the towel.

The towel pattern can be varied.  I wove the  fourth towel in a pattern of small squares. This towel has been washed once then pressed.  This towel is not dependent upon an exact length of warp so it is useful for the final towel of the four. If my warp is not long enough, the pattern repeat is short so I can weave to the very end of the warp leaving just enough for the hem.


Close up of the towel woven in small square motifs.  

Dimensions.

Before washing
                                     Length    76 cm  width 54 cm

After washing
                                     Length  70 cm  width  50 cm


Hanging tags


I designed a hanging tag for these towel. Here is the weave draft for the blue hanging tag.

pattern for hanging tag.
There are 27 warp ends.  I used 8/2 cotton and blue 16/2 cotton used double.

The tag is 1.2 cm in width.


Here are the completed towels.

Completed handtowels


The towels are soft but are very efficient at drying hands.


I have woven variations of this design many times.  The towels are very hardwearing. I love the fact that when weaving, different colours can be used for the weft.  Next time I weave some more,  I think that I will vary the pattern.  I liked the small squares so I thought that I could design a different block pattern.


Happy weaving

Susan J Foulkes
January 2017