Saturday, 1 January 2022

Weaving patterned bands on multi-shaft looms

 Do check out the January edition of Handwoven magazine.  


I submitted a project about Stash Busting and it was accepted.  My project was weaving tea towels using up small quantities of yarn.  I am sure that all weavers have a stash which needs reducing.  Here are my tea towels, beautifully photographed by Handwoven. (permission was given to use this image).


Stash busting tea towels. Handwoven Jan 2022

My previous submission was Nov/Dec 2014, Vol 172, no 5, pages 66 - 68.   The Heart of the Swedish Band Weaving Tradition. My Baltic heart tea towel has been very popular.  These project details are available as a download at:

https://shop.longthreadmedia.com/products/baltic-hearts-tea-towels 


Using a multi-shaft loom to weave patterned bands.

You can weave narrow bands on a table loom or a floor loom with eight or more shafts.

The advantages of using a multishaft loom are:

  • You can weave more complicated patterns with greater ease.
  • You can weave longer bands.
  • The weaving is tighter because the tension is greater.
  • You can use very fine threads which would be very difficult to use with a back strap.
  • You can use pattern threads similar in colour to the background, which can be difficult to see. 

To help you design or copy bands I have used the Fiberworks PCW weave program.  You will need to adapt the following instructions if you use a different program. 


1.  The Threading Draft
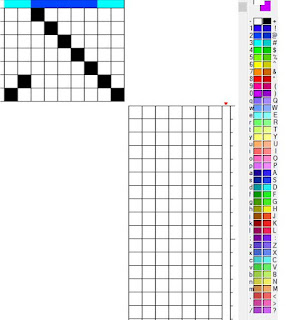


First set up the program so that it is in lift plan mode as the patterns are designed in the lift plan.  I set it to 7 shafts. There are five pattern threads for this band. The warp pattern threads are in dark blue colour. The four border threads are in pale blue. I changed the colour of the weft to white.

The full threading pattern shows the background threads and border threads and the two background threads in between each pattern thread.  It is important that the two background threads in between each pattern thread are threaded in the correct order. A pattern thread on a odd numbered shaft has a background thread on each side on shaft 2. A pattern thread on an even numbered shaft has a background thread on each side of it threaded on shaft 1. This is known as the Baltic threading and produces a crisp pattern on the front of the band and a crisp pattern in reverse on the back. 


The full threading draft


2.  Pattern Threads 

It is easier to plan your design using only the pattern threads and four border threads showing.


3.  Using the Lift Plan

You can now start to put in your pattern on the lift plan.  I have coloured the centre pattern thread red. The first two columns are  plain weave for the background and border threads. Leave these columns blank until the end. 
This pattern is for the Sámi band.  I have copied this pattern into the lift plan. All patterns must repeat over an even number of picks.  The plain weave lifts have not yet been added. Only the pattern is shown on the treadling. 

4.  Adding Plain Weave

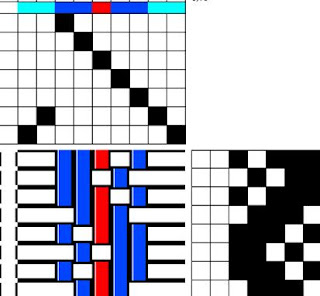
The next stage is to put in the plain weave for the background and border. For this you need to examine the centre thread of the pattern.  In this case it is on shaft 5.  I have coloured it red. Look for the section when it is raised over three threads.


When weaving with a rigid heddle, the centre thread is always threaded through the centre hole.  The background threads next to it are threaded through the slots. So, if this pattern thread is on an odd numbered shaft, the first pick raised over three threads should also raise the background threads on shaft 1.  This means that the background thread on shaft 2 which is on each side of the pattern thread will be lowered. This covers the background thread underneath so it does not show on the reverse side of the band. You can now fill in the plain weave.

It is important to add the plain weave in the correct order. These are filled in down the left side of the treadling. 


Here the plain weave has been added to the treadling.


This is the full drawdown.  The treadling repeat is eight rows.  The top row is the first and represents lifting shafts 1 3 5 6 7 
The second pick lifts shafts 2 4 6 7 

5.  Check the pattern repeat

The final check is to ensure that you have a correct pattern repeat. Go to the weft button and repeat the pattern.  If the pattern is regular  you know that your pattern  repeat is correct. The plain weave border threads are in pale blue. The centre of the pattern threads has been coloured red. The treadling now shows two pattern repeats. 


7.  Weaving: more than eight shafts

If you have up to eight shafts available, you can weave all five thread patterns (symmetrical and asymmetrical) and seven and nine thread symmetrical patterns.

For seven and nine thread symmetrical patterns, you will need to use a point draft.  Asymmetrical patterns for 7 and 9 pattern threads require a straight draw on 9 or 11 shafts.


Sashes

In 2018 I was commissioned to weave a set of six sashes for the Journal for Weavers, Spinners and Dyers.  I used my 32 shaft Megado loom.  Here is one sash in the process of being woven. This complex piece of weaving would have been extremely difficult to produce using a heddle. 


Do check out my blog for April 2019 for details. 

I have woven a small banner for the International Conference in Denmark in 2022. These letters have thirteen pattern threads. 


 Nordic and World Braids and Bands 2022
August 14-19, Svendborg, Denmark
5th International Conference on Braiding


The information about this wonderful conference is now available at https://thebraidsociety.wildapricot.org/Braids-2022

Do check out the details of the two workshops I will be taking on my blog. 

A happy and peaceful 2022 to everyone. 
with very best wishes

Susan J Foulkes  January 2022


Wednesday, 1 December 2021

Simple band weaving for Christmas part 2

 Making Christmas cards with woven bands.


Here is an idea for using woven bands for Christmas cards.  I have an collection of woven bands - left over from projects, samples etc. I tipped out my 'band box' and sorted them into colour groups.  


These are some of my woven bands. They are plain bands, that is there are no additional pattern threads.  These are quick to weave and I enjoy making them.  I often weave a much longer length than I need for a project just for pleasure. 

This was my first loom and it has been in constant use ever since.  


I found the band that was on my Swedish band loom when I bought it from Don Porritt. When I visited his showroom, the band loom had a sample warp on it to demonstrate to visitors how it is used.  I found this scrap of band when I sorted my own bands.   It is made with fine cotton in red black and white. It is 1cm in width.


Making a Christmas card with a woven band.

Here is an easy project for you for Christmas to use up some of your own stash of bands. This band was made in white cotton and blue glitter yarn and is 1cm in width. There are 39 ends in total.


1. Choose the blank card and decide upon the height and width of the triangle shape for the Christmas tree.  Draw the triangle onto graph paper.  This will be the template for the front of the card. 

Choose the woven band and lay it along the bottom edge of the triangle. Mark the top and bottom edges of the band.  


2. Draw a straight line across to indicate the position of the band. Now lay the band further up the triangle and mark the top and bottom edges. 


3. Repeat until you have enough lengths of band to fill the triangle.


4. For this card, I used five strips of band.  The band is fairly narrow.  You could use a wider band and have fewer strips across the triangle. 


5. Take a ruler and craft knife.  Cut the slits at each side of the triangle.  They should be slightly wider than the actual woven band.


 6.Now start to thread the band through the slits. Leave a short length on the reverse side to start.


7.  Here is the card on the front with five strips of band.


8. Here is the reverse side of the card front. At the top, trim the band and tuck in behind the top strips.  At the bottom, use a piece of doubled sided sticky tape to secure the end in place.

Finishing the card.

The front of the card needs to be finished.  Add a decorative star or other item for the top of the tree.  For the base of the tree, use some birch bark or other material to indicate the base. 

Some finished cards. 


I have not yet decided what to put onto the top of the Christmas tree shapes on two of the cards. Perhaps a stick-on star?


I wish you all a very happy holiday at the end of this difficult year. Let's look forward to a better 2022.

Happy Weaving

Susan J Foulkes  December 2021


Handwoven magazine 2022


Do check out the next edition of Handwoven magazine.  I submitted a project about Stash Busting and it was accepted. It is in the first 2022 edition of Handwoven.  My project was weaving tea towels and using up small quantities of yarn.  I am sure that all weavers have a stash which needs using. 

My previous submission was Nov/Dec 2014, Vol 172, no 5, pages 66 - 68.   The Heart of the Swedish Band Weaving Tradition. My hearts and flowers tea towel has been very popular. 

These project details are available as a download at 

https://shop.longthreadmedia.com/products/baltic-hearts-tea-towels 

I was asked about this pattern recently which gave me an idea for my next blog in January 2022. I will be examining how a patterned band can be woven on a multi-shaft loom.  


Happy festive season and I do hope that you have a peaceful New Year. 

Susan


Monday, 1 November 2021

Simple Band Weaving for Christmas


 Simple Band Weaving for Christmas 

The three week workshop will run from 1 – 19 November 2021 with Zoom sessions on Tuesdays 2, 9 and 16 November 2021. Instructions, equipment and materials lists are posted on BraidsandBands 

My workshop will run for 2 weeks on Braids and Bands and then for one further week, for Braid Society members only, via the Braids Workshop Forum in the Members’ Area of the Society’s website. 

Why not join the Braid Society?  https://thebraidsociety.wildapricot.org/Join-Us There is an excellent Journal Strands and you get access to international conferences and online workshops. You can also give membership as a gift. What a wonderful Christmas present!

Do check out the Braid Society home page at https://thebraidsociety.wildapricot.org/

I thought that it would be interesting to share another idea for using woven bands at Christmas.  I correspond with an American weaver who is very skilled and enjoys trying new things.  For several years Nancy has sent me decorations for my Christmas tree.  My Christmas tree is a memory tree of friendships and past holidays. It is so exciting decorating the tree each December because each hanging item brings back happy memories. 

Here are two hanging decorations made by Nancy who gave me permission to use them in my blog.


It is such a simple idea and they sparkle on the tree. They are woven with 13 pattern threads with glitter yarn as the pattern thread on a background of plain cotton.  Each end is sealed in a small tape and then folded over. 

Here is the pattern for the central star. 


Nancy wove other more complex patterns as hangings which are larger. One has 21 pattern threads in an everlasting knot pattern. 


Making a bookmark.

I decided to weave a narrow band in 16/2 cotton with a pattern of sparkly stars using 9 pattern threads. I used two designs.  Here is the design for the gold star with 9 pattern threads.


I used 11 border threads - 2 green, 3 red, 2 green and 4 white then the central section with  9 pattern threads in gold yarn then 4 white, 2 green, 3 red and 2 green. There are 2 white threads in between each pattern thread. The band width is 14 mm.


The second design is number 9.9 in my book Weaving Patterned Bands.  For this band I used a silver yarn Ricorumi dk from Fred Aldous and Company. It comes in a variety of colours. The silver is a polyester and nylon mix. 

I used 11 border threads - 2 emerald green, 1 red, 2 mid green, 1 red, 2 light green, 1 red, 2 emerald green then the central section with 9 pattern threads, then the border 2 emerald green, 1 red, 2 light green, 1 red, 2 medium green, 1 red, 2 emerald green. The band width is 14 mm.  I used the band to make a Christmas tree decoration. 


I wove two bookmarks with this design. Each bookmark has the name of the person woven in the centre. An excellent gift for a weaver.  My book Weaving Patterned Bands: How to create and design with 5, 7 and 9 pattern threads has over 140 patterns for you to try. It is published by Schiffer Press and it is available from Amazon and craft shops. Bookmarks and friendship bracelets are on pages 114 - 115

Two bookmarks

Here are the two bookmarks for Camilla and Amelie with silver stars. Bookmarks are quick and easy to make and are such a personal present for Christmas - particularly for a bookworm!  The bookmark is secured at the beginning by using the tail of the first weft pick as a second weft for the next three or four picks.  This secures the weft so that the beginning of the band will not unravel. The centre section can be as long as you like. The end of the band is plaited so the it can hang out from the book. This plait also secures the end. 

You do not have to weave a message - a simple band will do. 


I have written a booklet for 9 pattern threads Weaving Messages: numbers and alphabet with 9 pattern threads which is available from Blurb.com   It is available as an ebook for an IPad, a printed booklet or an instant  PDF version


Happy Weaving.  I do hope that you will enjoy making items for Christmas. A personalised woven gift can mean so much.

Susan J Foulkes 1st November 2021

The latest edition of Strands - the Journal of the Braid Society has just been published. It is sent to all members - another reason to join the Braid Society. It is illustrated with beautiful colour photographs.


Friday, 1 October 2021

Using up yarn.

 Last year I went through  my stash of yarn.  It has reached mountainous proportions.  I found a collection of tussah silk yarns left over from a weaving project.  The amounts were too small to make a scarf but i thought that i would make a neck shawl.

I  used to crochet a lot but weaving took over.  I found my set of crochet hooks and the old copies of Mon Tricot that I had kept from the early 1970's.  I had previously sorted these and threw a lot away.  On looking through the issues I had kept I found that I had crocheted many of the items in them. I was particularly fond of shawls.


I made this shawl a few years ago. I used a whole cone of acrylic textured yarn.  

This time I was crocheting something much smaller.  I found a pattern I liked.  Originally I had crocheted this in blue wool - so many years ago that I no longer have it.  


I loved my circular shawl, but this time it was going to be much smaller - a neck scarf. 


It is lovely and feels so soft.  It is now cold enough to wear it. 

Looking through the old copies of Mon Tricot there were some quite amazing items.  Crocheted bikinis anyone?

A local shop sells vintage clothing and their window display are beautiful.   A few weeks ago they actually had two crocheted bikinis for sale.


Actually I have to confess that I took a selection of some of my old 70's garments into this shop to see if they wanted any of them.  They ended up as part of the window display. These bright hipster flares were all the rage. I cannot believe that I actually wore them in public!


Fortunately shawls do not seem to date quite as much fashion items.


Susan J Foulkes  October 2021


Wednesday, 1 September 2021

Old textiles and memories

Last month I redecorated my weaving room. I repainted all the walls.  This necessitated taking everything off the shelving.  It gave me a good opportunity to reorganise all my 'stuff'. Now my weaving room looks brighter and all the shelving units have neatly labelled transparent boxes.  For the first time I know where everything is!

Of course I found treasures that I had forgotten.  One set of items was the old crocheted and embroidered textiles from my grandmother. She died when I was six months old so I only know of her through my father talking about his mother. She had been injured in a munitions factory accident during the First World War as a result of which she had hearing difficulties and was lame. My grandfather was gassed in the trenches and suffered for the rest of his life with complications from this experience. 

She was widowed in 1936. She crocheted, knitted and embroidered constantly.  My father remembered as a very small boy being taken into town on a Saturday.  She liked to visit Bold Street which in the 1920's was a fashionable and expensive shopping area of Liverpool. The posh dress shops and fur shops were here. Of course she could not afford any of the goods but she liked to see what was fashionable.  She would stand in front of a dress shop and examine the lace or crocheted collars and cuffs on dresses. To  my father's great embarrassment, she would take her crochet hook out of her handbag and proceed to copy a motif or design she liked. 

Here is my dad.

My father developed an interest in craft, probably through necessity. He could embroider, sew and mend. You know the phrase a  jack of all trades and master of none – well, Dad was a jack of all trades and a master of many. He knew the shoe and leather industry – so when my brother and I were young he would mend our shoes. When I needed a satchel for school, he got the leather and hand stitched one for me. He was excellent at wood work and made a lot of furniture for the house. He could do beautiful woodwork and marquetry. He made me a wonderful dolls house and when I was given some Pelham puppets for Christmas and birthday presents, he made me a theatre.  This was an amazing piece because it had removable wings so that scenery could be changed.  The curtains were made from an old scrap of red material.  He found a length of curtain rail and made the curtains to open in the centre when a cord was pulled - just like a real theatre. The best thing was that it could be folded flat for storage - very necessary in our small terraced house.  I had four puppets - a cowgirl, a Tyrolean girl and dog and cat.  This stretched my playwriting abilities somewhat! 

In my bedroom there was a small rug which he had designed and made.  It had a picture of his dog - an Airedale terrier on a green background.   After the war, he enrolled in night classes to learn about house painting, electrics and plumbing. Not for a job - he was a shoe salesman.  He could lay concrete paving and he built a brick coal store for the house and used to do all the house repairs. He would mend clocks and always serviced the car. When money is tight ,then make do and mend is important. Nothing was wasted. 

My mum could knit and sew and was an excellent cook. It is not surprising that I developed a love of  making things.

I had kept my grandmothers small sewing box which disintegrated a few years ago. In tidying my  room, I found  my grandmothers crochet hooks and old cottons, some of her embroidery and crochet work and other memorabilia which I thought I would share.

The oldest item probably belonged to her mother or grandmother.  It is a printed cotton square, a memento of the Royal Jubilee Exhibition held in Manchester in 1887.  This exhibition was open for 166 days and 4.5 million paying visitors attended. 


Here is a close up of Queen Victoria


In her sewing box there were many examples of her crochet work.  They are yellow with age and some are simply scraps but I could never throw them away. Some of them look as though she was trying out motifs.  I wonder they were copied from shops in town.


The centre set of pieces has a small item which looks as though she was trying to crochet a picture of a tank. Here is an early photograph of her. She was very patriotic and took my father to London for the Nov 11 Remembrance Day processions. 


I also inherited some of her remaining crochet hooks.  They are very fine indeed.  The items at the top are a rug making tool and a hook for doing up buttons on boots. 


In 1936 my grandfather died in an accident so my father had to leave school and get a job to support his mother. In 1938 she took my father on a day trip to London to attend the Aldershot Tattoo.  I have the official programme and the travel booklet.  The trip was organised by a local newspaper.  The booklet lists all the passengers, what meals they had, the coach trip in London and details about the Tattoo.  The train seat numbers and coach numbers were carefully listed so that everyone knew what the arrangements were. 

My father and his mother and a friend set out from Lime Street Station in the centre of Liverpool.


The official programme is 36 pages with lots of information about the day. Here is the foreword to the tattoo.


 When war was declared my dad joined the Coldstream Guards and saw action in North Africa, Sicily, Italy and Yugoslavia.  At home, my grandmother embroidered this small cloth.  I still have the booklet which contained the iron-on pattern.


I was searching through my box of cloth to find some early pieces that I made. To my surprise I came across a plastic bag full of more crocheted items from my grandmother.  These are bigger pieces and completed table mats, embroidered cloths etc.  One piece is of particular interest.  

It is a triangular piece about 20 inches along the top edge.  Can you see the words For King and Country in the centre?  They are surrounded by flags. 


During the war, self help and craft skills were encouraged.  Many people are now familiar with the poster 'Make do and mend. ' 


She kept  the original Ministry of Information booklet from 1943.


Here is a page from the booklet. 


The details about new life for woollen goods is fascinating. 


Redecorating my room became more than just tidying and sorting.  It became a trip to my family's past and thinking about how a love of crafts can be passed on. Yes, I did learn to crochet - but that is another story.


Susan J Foulkes  September 2021