Showing posts with label rigid heddle. Show all posts

Thursday, 1 May 2025

Making a rigid heddle and shuttle at Northern Bowl

 I have just attended a one day workshop at Northern Bowl - organised by https://www.landofroots.co.uk/

I live within walking distance but I had not heard of this gathering before. However, I found that Amy Leake was running a one day workshop on making a rigid heddle so I signed up.  

https://www.facebook.com/a.woodmungler


I walked to the gathering ( about 45 minutes) and was pleased to see this sign.  
Workshops at the gathering
Once there, I could appreciate the number of workshops on offer - all were filled. It is a very popular event. 


Amy had two tables with a variety of equipment and examples. There were six of us signed up and we were soon drawing and cutting and sanding. Amy demonstrated everything very clearly and was very helpful once were were let loose with the equipment. 

The group were lovely and two of them kept us entertained whilst we were working by singing.

 The cutting of the slots could be achieved on a treadle machine.


Here is a heddle being finished by one of the group. 
Everyone had lunch around an open fire.  Home made bread and soup - very welcome on a cool day.

The gathering tent

In the afternoon, participants whittling wood used this area and were entertained by music. 
Music while you whittle

By the end of the day we had all made a heddle and shuttle and a warp and started to weave.


It was a wonderful  experience.  I will definitely sign up again if there is another workshop. 
The other workshops were also very busy.  Here are a few photos.

Carving a bowl

Pole lathe


There were two areas with pole lathes


Leather bag making
basket weaving

Finally, yes I made my shuttle and heddle.  Here is my heddle and shuttle.  I did not have the confidence to do a cut out design on the top. I thought that I would stop whilst it still looked OK.  I thought that I might decorate it by painting a design once I got home. 
My shuttle and heddle made from Sycamore wood

Here are some of Amy's designs.
Amy's designs

happy weaving

Susan J Foulkes  May 2025


Tuesday, 25 March 2025

The Turkuu heddle


This is a reproduction of the heddle from Turkuu, Finland. This is, at the present time, the oldest heddle found in Finland. It dates to the fifteenth century and is made of birch wood. It has holes and slots for 19 warp ends. 

This is another of Robin Goatey's lovely creations. See the dancinggoats studio  . 

I have tried it using a 16/2 linen warp.  I designed the first pattern but I was not happy with it when I wove it.  I cut off the warp and rethreaded it and tried again.  The second combination did not seem quite right.


Finally, with very little warp left I tried again. This time I was happier with the colour order but only 18 warp ends were used. 


The two single centre warp ends are a doubled thread. The weft is the mid orange colour so that it shows on both selvedges. 

The woven band is 8mm in width. 


Close up of the woven band

It is fascinating using old designs of rigid heddles to weave.  There is so much to be learned from trying out the form of an heddle. 

Happy weaving

Susan J Foulkes  March 2025


Friday, 1 November 2024

Explorations with a rigid heddle: double hole rigid heddle weaving

   Using rigid heddles with two rows of holes. 

When I started to learn to weave narrow bands with a rigid heddle,  came across a very useful article.

https://fiberarts.org/design/articles/rigidheddle2.php

This article was the first I had seen which discussed the use of rigid heddles which had been designed with a specific purpose.  It was not easy to find such heddles in the UK.  My first idea was to take a standard rigid heddle and drill a second row of holes.

For the pattern described on the information sheet, the heddle with two rows of holes was threaded in a very particular way. 

There is an error in the threading on the download. This chart gives the correct threading should you wish to use it.


The unusual feature of this way of weaving is that one centre row of holes is not used. Only the row of holes above them are threaded and these are the pattern threads. I decided to start small for this exploration and used only five white pattern threads and 16 green threads for the background and border.


Warp: double knit cotton in green and white. 
Weft: double knit cotton in green.


Here  you can seen the woven band. It is warp-faced so that the weft is hidden by the warp threads.  The white pattern threads in the holes form part of the warp layer so here is only one green warp end between each white pattern end. 

I tried several different ways of picking out the pattern. 

Keeping all five pattern threads on the top leaves a solid line of white across the band. 

Each pattern repeat is four picks in length.  For the final pick all pattern threads are on the bottom layer of the warp so that the green warp ends are on the surface. 

Here are some pattern variations.

The simple alternating stripe. 

Raising the heddle - all the threads in the holes are on the top of the warp so that there is a white stripe across the centre of the band.

Lowering the heddle - all the threads in the holes that is the five white threads and the border green threads are on the bottom layer. There is a green stripe across the centre of the band. 


Here is a sample. 

To start, raise the heddle and keep all the pattern threads on top.

Then lower the heddle and keep all the pattern threads underneath.


Now you can continue with a pattern. These variations involve picking up a number of white ends when they are in the lower layer of the warp. 

Here is the weave chart.  The left column indicates the picks. R means raise the heddle and L means lower the heddle. 

Each pattern repeat is four picks. For pick 8 when the heddle is lowered two pattern threads on the right side  should be picked up. For pick 12, two pattern threads on the left side should be picked up.

Here is another variation.


A further variation.


Here is another variation. 


The reverse side of the woven band.

This was an interesting start to exploring this type of heddle. The weave structure is unusual. In the excellent book 'Weaving Bands' by Liv Trozig and Astrid Axelsson (1974) it is described as 'the pattern threads form part of the ground when they do not form the pattern.'   It was this book which I used to teach myself patterned band weaving so I have a real fondness for it. They use a standard heddle for this weave structure,  but the second row of holes makes picking out the pattern easier. 

Heddles with two rows of holes - using both rows.

In subsequent years I bought heddles with a second layer of holes. Adding in a row of pattern threads in the second row of holes forms a different weave structure.  For warp faced bands, the pattern threads in the second (upper)row of holes are described as a supplementary warp. These float over or under the warp faced plain weave formed by the ground threads. The ground threads  are in the spaces and holes across the centre of the heddle. In this weave structure there is one ground thread between the pattern threads.

Usually, the pattern threads are picked up in groups rather than singly. 

Two standard heddles with second row of holes

In the Sami weaving tradition, some pattern bands were woven using the pattern threads over the heddle. 


Sami weaving with pattern threads over the heddle.

 These were not under tension and could be selected by pulling the pattern threads down by the use of a string heddle. It is not an easy technique to learn. 
This method is beautifully illustrated in the book Oahpa cuoldit by Liv Nilsen and Jane Juuso (2018) pub: Isak Saba guovddas.

One weaver designed her own version, the Beavi heddle, and Stoorstalka produced it for her.  Here is her video of the heddle in use. 

Sami Double Hole Rigid Heddle Weaving

https://youtu.be/f1c3lzq3o2k?si=ny80aHtwtIHZcIKR

This heddle has two rows of holes but neither are in the centre of the heddle. This enables the threads to be picked up or dropped more easily.

The Beavi heddle with two offset rows.

Stoorstalka also designed a special heddle for this type of weaving.  with a Sámi  weaving tutor. This is the Sigga heddle. 

Three Sigga heddles from Stoorstalka.

The Sigga heddle has a separate layer of shorter slots for the pattern threads. In Sámi  weaving the pattern threads are slightly thicker than the background threads. The weave structure for the ground threads is warp faced plain weave.  There are two ground warps in between each pattern warp. I made two YouTube videos to illustrate this. 


Here is one of the Sámi  bands that I wove with this heddle. 

Using the Sigga heddle


Weaving a belt at home in 2022


Bryggen heddle

Some older heddles also have additional rows of holes such as the heddle from Bergen in Norway.

I decided to demonstrate this with the heddle designed by Robin Goatley based on the Bryggen heddle. This heddle has the second and third row of holes at the top and bottom edge of the heddle.

I started by just using the centre holes and slots. 

Here is the threading diagram.


E means that the hole or slot is empty.

The band  when woven just using the centre row of holes and slots appears like this. The band has a red centre stripe alternating with a blue stripe. The woven band is on the same front and reverse. 

Woven band is the same on front and reverse

Using two rows of holes.

Bryggen heddle
 
I started simply by just using the top row of holes in addition to the centre holes. Here just two rows of holes are threaded. The top row is the pattern thread.  The centre row and the slots from the ground warp. This means that the ground warp weaves as a warp-faced plain weave with the pattern threads floating over it. The pattern threads are a supplementary warp. 

This heddle has three rows of 13 holes. For this pattern I am only using the top and centre row. The five pattern threads are white. the centre of the warp-faced plain weave band has five red threads. When the second row of holes is added, the white pattern threads float over the top surface of the band.  Simple patterns can be made. 

Here is the threading diagram


Front of band showing white pattern threads.

The reverse of the band does not show any white threads but the picks alternate red and blue in the centre. The band is thicker than the previous band because of the extra layer of white pattern threads.

Bird Heddle from Sweden

I made another warp for the lovely Bird heddle. This heddle has holes and slots for 53 warp ends with a row of 13 additional holes 

Bird heddle handle underneath

Here is the threading chart.


For this heddle the two birds are on top and this is the handle.  This means that in use the two birds will be underneath and the red pattern threads are in the row underneath the central row of holes. 

Raising the heddle leaves the red threads in the centre of the shed. Putting the weft through underneath this row of red and between the two rows of blue warp ends means that only the blue warp threads will appear on  the underneath of the band. 


raising the heddle

Lowering the heddle puts the row of red threads below the bottom layer of warp. Taking the weft in the shed between the two blue warps, leaves all the red threads showing on the underneath of the band. 

Lowering the heddle

By varying the number of pattern threads to appear on the  underside of the band, patterns can be made.ere is a close up of the woven band showing both sides.


Close up of woven band

Like the first band, the pattern here repeats over four picks. Experiment with the pattern to produce variations. 

Next month I will examine weaving with three rows of holes.  Wish me luck!

Happy weaving exploration.

Susan J Foulkes November 2024

Thursday, 1 August 2024

Making a rigid heddle - the very simple way.

Many years ago when I prepared my second online workshop about band weaving I was aware that obtaining a rigid heddle for backstrap weaving was not easy in the UK. My first workshop booklet gave details on how to make your own heddle. I have updates the information a little as nowadays it is possible to buy very sturdy craft sticks from craft stores.  

For your completed heddle you will need: 

  • I used wooden coffee stirrers. Nowadays craft sticks are much better.  These tend to be stronger and smoother but will still need some sanding. 
  • glue (woodworking PVA would allow for final adjustments—impact adhesive sticks straight away).
  • fine sand paper or wire wool. 
  • a drill: you will need a very fine drill bit.
  • And a length of wood, approx 24 mm in width at least as long as four sticks.  (This should be flat one side but may be shaped on the other. This will be used to sandwich the sticks into place and forms the top and bottom of the heddle.)


1.  Choose sticks  that are straight and not warped.  

2.1 Sand them to ensure that they are completely smooth. 

2.2  Mark the centre and drill a small hole in each stick.  You will need at least 18 sticks for the final heddle, plus extras for the top and bottom.

2.3 Measure the width of the heddle by separating the sticks with a space.  This will be the final width of your heddle.

2.4 Sand them again and finish with wire wool.  Make sure that the sides of the sticks are smooth.  You will need more sticks than you eventually use for the heddle.  Some will splinter or split.  In others,  you may find that your drilled hole is not central.


3. From your piece of wood, cut four pieces the final width of the heddle.  These will form the top and bottom of the heddle.

4. Take two undrilled sticks ( or more if the heddle is wider) and glue them to two of the wide sticks on the long edge. Leave until the glue is dry. These will form the buffers against which you line up the rest of your stirrers.


5. Spread glue along the wide sticks and place one drilled stick at each end.  You now have the outline of your final heddle.  It is important that the corners of the frame are square.  Use a piece of square card ( a postcard for example) as a right angled corner to check.


6. Start to place the rest of the sticks into place onto the glued ends sticks  Adjust the gap between each stick.  Make the gaps as even as possible. Use a piece of card  as a spacer.


7. 1  To complete your heddle, glue the remaining two cut wide pieces of wood to the top and bottom, sandwiching the ends of your stirrers.


Side view of heddle top/bottom


7.2 Place a weight on the completed heddle and leave the glue to dry.


The completed heddle


8. You will need to sand the top and bottom of the heddle as any unevenness will catch on the warp threads.  

The heddle is now complete.

I made several heddles like this and gave them away.  Here is the one that I kept.

Threading the heddle 

I made some other simple pieces of equipment to make threading a heddle easier. 
Here are a set of cross sticks for making the warp, and a heddle holder. The cross sticks are two narrow slats of smooth wood with two fasteners to hold them together. The heddle holder is a rectangular piece of wood with four screws to hold the heddle upright. As you can see I am not a woodworker!  

Threading the heddle.


The heddle is slotted between the sets of large screws so that it is upright. The cross sticks hold the warp. I use a heddle threader and a needle threader.


Here is a close up with half the warp threaded through the slots and holes.

Weaving.

I use a back strap and a band lock.  


Here is the drawdown for this simple warp faced band.


Here is the warp diagram for this band. The centre of the band is marked.


The warp plan - there are 18 warp ends in total. 

   X 5   X 5
Blue {1 {1
Brown 1} 1}
Pale blue 8

This band is a sanada-himo band which are the traditional woven bands in Japan. The weft thread is thicker than the warp threads.  here the warp threads are a 16/2 cotton and the weft is a natural 8/2 cotton ( approximately twice as thick as the warp threads). The final width of the band is about 6mm.

Weaving the sanada-himo band


I use a band width checker to ensure that the width of the woven band is constant.  Attached to the back strap is a band lock device which is a quick release way of attaching the woven band to the backstrap.  
I bought this one a few years ago.  They are available from 

They are called strap locks. 
This is a wonderful shop in Boras in south Sweden.  Check out the beautiful heddles.  I have the horse, the bird and the heart heddles. They are lovely to use. 


The Finished band.


Some more tips.

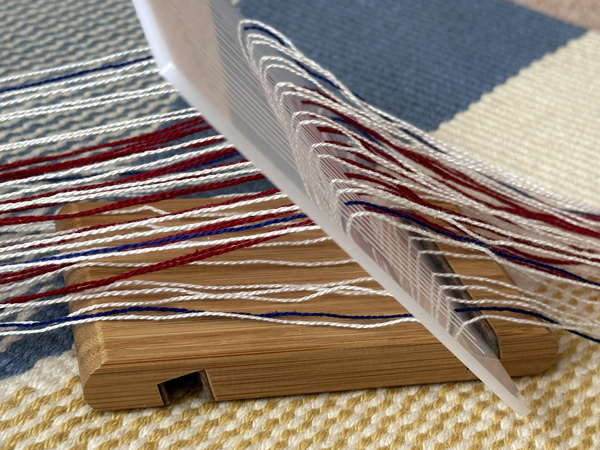
I used my own handmade heddle stand - yes, it is a bit crude. For thinner heddles I have successfully used an IPad stand from IKEA.

The IKEA IPad stand

I found that an additional strip of felt holds the heddle more firmly and more upright.


The heddle sits at an angle in the stand. If the heddle is very fine then the slot holding the heddle may need to be padded. 


The front view.


Here is another view showing the threading in action.

Happy weaving

Susan J Foulkes  August 2024


Susan J Foulkes  August 2024