Many years ago when I prepared my second online workshop about band weaving I was aware that obtaining a rigid heddle for backstrap weaving was not easy in the UK. My first workshop booklet gave details on how to make your own heddle. I have updates the information a little as nowadays it is possible to buy very sturdy craft sticks from craft stores.
For your completed heddle you will need:
- I used wooden coffee stirrers. Nowadays craft sticks are much better. These tend to be stronger and smoother but will still need some sanding.
- glue (woodworking PVA would allow for final adjustments—impact adhesive sticks straight away).
- fine sand paper or wire wool.
- a drill: you will need a very fine drill bit.
- And a length of wood, approx 24 mm in width at least as long as four sticks. (This should be flat one side but may be shaped on the other. This will be used to sandwich the sticks into place and forms the top and bottom of the heddle.)

1. Choose sticks that are straight and not warped.
2.1 Sand them to ensure that they are completely smooth.
2.2 Mark the centre and drill a small hole in each stick. You will need at least 18 sticks for the final heddle, plus extras for the top and bottom.
2.3 Measure the width of the heddle by separating the sticks with a space. This will be the final width of your heddle.
2.4 Sand them again and finish with wire wool. Make sure that the sides of the sticks are smooth. You will need more sticks than you eventually use for the heddle. Some will splinter or split. In others, you may find that your drilled hole is not central.

3. From your piece of wood, cut four pieces the final width of the heddle. These will form the top and bottom of the heddle.
4. Take two undrilled sticks ( or more if the heddle is wider) and glue them to two of the wide sticks on the long edge. Leave until the glue is dry. These will form the buffers against which you line up the rest of your stirrers.
5. Spread glue along the wide sticks and place one drilled stick at each end. You now have the outline of your final heddle. It is important that the corners of the frame are square. Use a piece of square card ( a postcard for example) as a right angled corner to check.

6. Start to place the rest of the sticks into place onto the glued ends sticks Adjust the gap between each stick. Make the gaps as even as possible. Use a piece of card as a spacer.

7. 1 To complete your heddle, glue the remaining two cut wide pieces of wood to the top and bottom, sandwiching the ends of your stirrers.
 |
| Side view of heddle top/bottom |
7.2 Place a weight on the completed heddle and leave the glue to dry.
 |
| The completed heddle |
8. You will need to sand the top and bottom of the heddle as any unevenness will catch on the warp threads.
The heddle is now complete.
I made several heddles like this and gave them away. Here is the one that I kept.
Threading the heddle
I made some other simple pieces of equipment to make threading a heddle easier.  Here are a set of cross sticks for making the warp, and a heddle holder. The cross sticks are two narrow slats of smooth wood with two fasteners to hold them together. The heddle holder is a rectangular piece of wood with four screws to hold the heddle upright. As you can see I am not a woodworker!

Threading the heddle.

The heddle is slotted between the sets of large screws so that it is upright. The cross sticks hold the warp. I use a heddle threader and a needle threader.

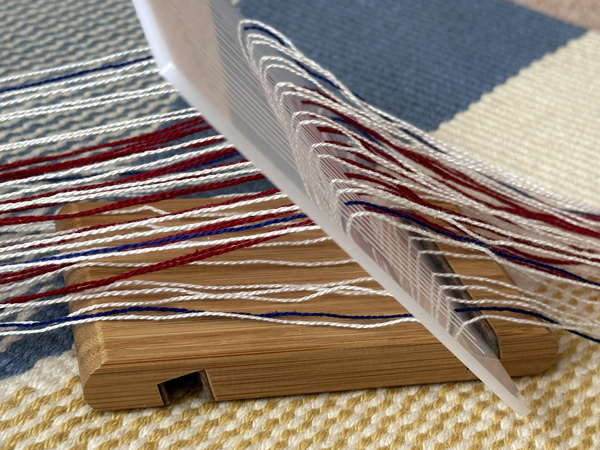
Here is a close up with half the warp threaded through the slots and holes.
Weaving.
I use a back strap and a band lock.
Here is the drawdown for this simple warp faced band.


The warp plan - there are 18 warp ends in total.
X 5 X 5
Blue {1 {1
Brown 1} 1}
Pale blue 8
This band is a sanada-himo band which are the traditional woven bands in Japan. The weft thread is thicker than the warp threads. here the warp threads are a 16/2 cotton and the weft is a natural 8/2 cotton ( approximately twice as thick as the warp threads). The final width of the band is about 6mm.
 |
| Weaving the sanada-himo band |

I use a band width checker to ensure that the width of the woven band is constant. Attached to the back strap is a band lock device which is a quick release way of attaching the woven band to the backstrap.
I bought this one a few years ago. They are available from
They are called strap locks.
This is a wonderful shop in Boras in south Sweden. Check out the beautiful heddles. I have the horse, the bird and the heart heddles. They are lovely to use.
The Finished band.

Some more tips.
I used my own handmade heddle stand - yes, it is a bit crude. For thinner heddles I have successfully used an IPad stand from IKEA.
 |
The IKEA IPad stand |
I found that an additional strip of felt holds the heddle more firmly and more upright.
 |
| The heddle sits at an angle in the stand. If the heddle is very fine then the slot holding the heddle may need to be padded. |
 |
| The front view. |
 |
| Here is another view showing the threading in action. |
Happy weaving
Susan J Foulkes August 2024
Susan J Foulkes August 2024
Thank you for posting this. I've got a lot of stirrers so I'm bursting to get started. Love making my own equipment.
ReplyDeleteI surprised myself when i made it. Remember that sanding the stirrers is very important. They must be smooth so that the warp threads do not catch. Good luck.
DeleteСпасибо, интересно. Успехов в ткачестве.
ReplyDeleteThank you.
Delete