Thursday, 1 August 2024

Making a rigid heddle - the very simple way.

Many years ago when I prepared my second online workshop about band weaving I was aware that obtaining a rigid heddle for backstrap weaving was not easy in the UK. My first workshop booklet gave details on how to make your own heddle. I have updates the information a little as nowadays it is possible to buy very sturdy craft sticks from craft stores.  

For your completed heddle you will need: 

  • I used wooden coffee stirrers. Nowadays craft sticks are much better.  These tend to be stronger and smoother but will still need some sanding. 
  • glue (woodworking PVA would allow for final adjustments—impact adhesive sticks straight away).
  • fine sand paper or wire wool. 
  • a drill: you will need a very fine drill bit.
  • And a length of wood, approx 24 mm in width at least as long as four sticks.  (This should be flat one side but may be shaped on the other. This will be used to sandwich the sticks into place and forms the top and bottom of the heddle.)


1.  Choose sticks  that are straight and not warped.  

2.1 Sand them to ensure that they are completely smooth. 

2.2  Mark the centre and drill a small hole in each stick.  You will need at least 18 sticks for the final heddle, plus extras for the top and bottom.

2.3 Measure the width of the heddle by separating the sticks with a space.  This will be the final width of your heddle.

2.4 Sand them again and finish with wire wool.  Make sure that the sides of the sticks are smooth.  You will need more sticks than you eventually use for the heddle.  Some will splinter or split.  In others,  you may find that your drilled hole is not central.


3. From your piece of wood, cut four pieces the final width of the heddle.  These will form the top and bottom of the heddle.

4. Take two undrilled sticks ( or more if the heddle is wider) and glue them to two of the wide sticks on the long edge. Leave until the glue is dry. These will form the buffers against which you line up the rest of your stirrers.


5. Spread glue along the wide sticks and place one drilled stick at each end.  You now have the outline of your final heddle.  It is important that the corners of the frame are square.  Use a piece of square card ( a postcard for example) as a right angled corner to check.


6. Start to place the rest of the sticks into place onto the glued ends sticks  Adjust the gap between each stick.  Make the gaps as even as possible. Use a piece of card  as a spacer.


7. 1  To complete your heddle, glue the remaining two cut wide pieces of wood to the top and bottom, sandwiching the ends of your stirrers.


Side view of heddle top/bottom


7.2 Place a weight on the completed heddle and leave the glue to dry.


The completed heddle


8. You will need to sand the top and bottom of the heddle as any unevenness will catch on the warp threads.  

The heddle is now complete.

I made several heddles like this and gave them away.  Here is the one that I kept.

Threading the heddle 

I made some other simple pieces of equipment to make threading a heddle easier. 
Here are a set of cross sticks for making the warp, and a heddle holder. The cross sticks are two narrow slats of smooth wood with two fasteners to hold them together. The heddle holder is a rectangular piece of wood with four screws to hold the heddle upright. As you can see I am not a woodworker!  

Threading the heddle.


The heddle is slotted between the sets of large screws so that it is upright. The cross sticks hold the warp. I use a heddle threader and a needle threader.


Here is a close up with half the warp threaded through the slots and holes.

Weaving.

I use a back strap and a band lock.  


Here is the drawdown for this simple warp faced band.


Here is the warp diagram for this band. The centre of the band is marked.


The warp plan - there are 18 warp ends in total. 

   X 5   X 5
Blue {1 {1
Brown 1} 1}
Pale blue 8

This band is a sanada-himo band which are the traditional woven bands in Japan. The weft thread is thicker than the warp threads.  here the warp threads are a 16/2 cotton and the weft is a natural 8/2 cotton ( approximately twice as thick as the warp threads). The final width of the band is about 6mm.

Weaving the sanada-himo band


I use a band width checker to ensure that the width of the woven band is constant.  Attached to the back strap is a band lock device which is a quick release way of attaching the woven band to the backstrap.  
I bought this one a few years ago.  They are available from 

They are called strap locks. 
This is a wonderful shop in Boras in south Sweden.  Check out the beautiful heddles.  I have the horse, the bird and the heart heddles. They are lovely to use. 


The Finished band.


Some more tips.

I used my own handmade heddle stand - yes, it is a bit crude. For thinner heddles I have successfully used an IPad stand from IKEA.

The IKEA IPad stand

I found that an additional strip of felt holds the heddle more firmly and more upright.
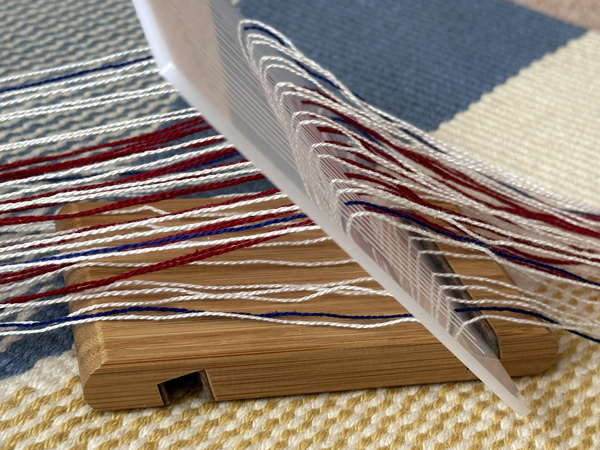


The heddle sits at an angle in the stand. If the heddle is very fine then the slot holding the heddle may need to be padded. 


The front view.


Here is another view showing the threading in action.

Happy weaving

Susan J Foulkes  August 2024


Susan J Foulkes  August 2024

Monday, 1 July 2024

West County Whipping or West Country Whipping?


The Ashley Book of Knots by Clifford W. Ashley.

The ever reliable Ashley Book of Knots describes a number of ways of finishing cords.  The method I use is West Country Whipping. It is described on page 528.  According to Ashley, it was named in 1848. However, in subsequent books such as the British Admiralty Manual of Seamanship it was renamed West County Whipping. 

It is a sturdy way of ending a braid or band. Its structure is secured by the regular half knot so that if any strand breaks it will still hold and the whipping replaced. 


This is the whipped end of the Bookmark of Kells project in my blog for May 2024. This project appears in Little Looms Summer 2024.

It is very easy to do.  It consists of a series of half knots finished with a reef knot. This short video shows the process.


Start by tightening the end of the cord or band by pulling on the weft. 

Take a short length of yarn sufficient for making the binding.

  1. Tie it with a half knot.
  2. Turn the band or cord over and tie another half knot.
These two moves make the binding.  To finish, tie a reef knot. 

This binding is very secure. It can be used for bands, cords and tassels.

narrow bands

Tassels can be tied with this type of whipping.


binding a tassel.

Here is the link to the YouTube video. 

West Country Whipping for bookmark

https://youtu.be/kp5nrA7DLAI

Susan J Foulkes  August 2024

Sunday, 16 June 2024

Binding the ends of a Sámi belt.

A beautifully finished Sámi belt.


Sámi belts have a range of different endings. One of the most decorative is the multi-coloured binding.  This is easy to do.

This type of binding is called a three-strand plait in the Ashley Book of Knots on page 488. This is an amazing book. My copy has started to fall apart as I have referred to it so often. 

A Sámi belt 

Here is a belt that I wove using the Sigga heddle.

Sámi belt woven on the Sigga heddle. 
 
Sigga belt  width: 25mm  length: 172cm  Material used: Sámi band weaving wool
I wove it for a workshop at the International Conference on Braiding in Denmark 2022. The warp stretched across the room.
 
Weaving the belt at home

I made a number of belts and band samples to illustrate the different patterns made with this type of weaving.

Two samples of binding.

I am giving a workshop in Oxford this month.  I wove a number of short samples so that participants could learn how to finish a band. These bands are woven on a Sunna heddle with 9 pattern slots. 
Samples to practice binding.

The Decorative Binding Sequence.

Here is the sequence in pictures to show the process of binding.


Step 1 Divide the warp into four sections. Two sections are used to make the binding on each side. These are called the foundation groups.

Step 2 Take two strands of yarn from the right hand side. This is the working strand.Take them over the first group and then under the second group.


Step 3. Take the working strand over the left group and then under the first right hand group.
These two movements are repeated for the length of binding that is required.  movements 


Step 4. Take the working strand over the right hand group and under the left. Pull tightly and push up the working end to fully cover the group of threads. 


Step 5. Take the working strand over the left group and under the right hand group. Pull tightly and push the binding together. 


Step 6 Changing colour. The white working strand is over the left group.  It will be part of the  right hand group of threads for the next binding colour.
Take the next coloured binding thread from the right hand group.  Take the blue working strans over the right group and under the left group.


Step 7. Changing colour. The blue binding thread will be in the left hand group. The next colour, red comes from the left hand group. This is to ensure that each group remains approximately the same thickness. 

Keep binding until you are happy with the length.
Finish with a tassel or West Country Whipping.

The Working Thread.

It is important that the working threads are of the same thickness. The eight red pattern threads and the one blue central pattern thread are twice as thick as the other background threads. So for this binding, the working thread is two strands when using a background thread. This makes them the same thickness as a single pattern thread.  

The Ashley Book of Knots suggest that the binding thread, the working thread, should be at least five or six times longer than the area you wish to cover.

I have made a YouTube video to show the process in action.

Here is the link:

Sámi Decorative Binding


Happy decorative binding!

Susan J Foulkes  June 2024

Friday, 3 May 2024

Bookmarks inspired by the Book of Kells


Little Looms Summer 2024

Little Looms is a wonderful magazine devoted to items that can be woven on small equipment.  The latest edition has one of my projects for an inkle bookmark inspired by the colours of the Book of Kells. 

In 2023, two Irish stamps were issued each showing an illustration from the book.


The Book of Kells is a 9th century  Irish medieval masterpiece in Trinity College, Dublin. The book has an astonishing array of illustrations. 

It is fascinating to examine the illustrations up close to see how the monks used a variety of patterns within the designs.  I used a lovely book by Bernard Meehan published by Thames and Hudson 1994. It has 110 colour illustrations and is well worth buying.


The Book of Kells by Bernard Meehan

It is astonishing that only eight pigments were used throughout, which were combined to form new colours or shades. 


Colour inspiration 

Colour inspiration .


Many of the characters are outlined with dots. 

For the Bookmark of Kells project in Little Looms, I wove many samples and the editor chose the two to use for the magazine. 


Some of my samples


I wove some of them on a rigid heddle. 


Others were woven on my floor inkle loom.

Plaiting a flat 5-end braid.

To finish the bookmarks, I divided the warp ends into five more or less equal groups.  I plaited them into a flat braid. Here are the instructions in pictures.

Starting position


First move


Second move. 

These two moves are repeated until the length of the plait is reached.


Adjust the tension on the groups of threads.

YouTube Video  


I have also uploaded a short video showing the process. Here is the link.  Plaiting with five groups of threads:

https://youtu.be/SZt3p87oI68

Do check out the magazine for some lovely projects. 

You can subscribe to Little Looms and receive your copy digitally. https://littlelooms.com/subscription/  Instant satisfaction!

Some of my other samples


Some of my many samples. 


Look at the front and reverse of these two bookmarks.  The top bookmark has been woven with a yellow weft.  The bottom bookmark has been woven with an orange weft. 


 The yellow weft gives an interesting dotted pattern on both sides.

The orange weft gives the dotted edge to the bookmark.


Now I have lots of bookmarks to give away to friends!

Susan J Foulkes  May 2024


https://youtu.be/SZt3p87oI68?si=OWY2ew4p2pUbO5Bk