Saturday, 15 June 2019

Lithuanian Weaving

Two years ago I was fortunate enough to be able to travel around the Baltic region.  I had not visited Lithuania before and I was impressed with the weaving traditions that I found.

The National Museum in Vilnius is in a wonderful building and their displays of textiles are fascinating.

National Museum in Vilnius
In my previous blog about my trip, I showed an example of the lovely costumes on display.  Here is another costume and a close up of the colourful patterned belt.


Close up of the patterned belt.

The belt has the typical 'moustache' fringe at each end.


The belt was worn until the end of the 19th century and was a very important part of the dress. A belt was worn everyday but on special occasions, a more elaborate sash was put on. Sashes were given as presents. When a woman married she was expected to weave dozens of sashes to give away on her wedding day as well as for her dowry.  These sashes would demonstrate her skill in weaving and also help to smooth the path to her new life with her husbands family.


I loved the patterned bands that I saw in the museum.  I have graphed and woven a few of them.  Here is a beautiful patterned band with the typical moustache fringe.

My own reproduction of a Lithuanian patterned band.
I loved the colours and the pattern.  The fringe takes a lot of wool!


Here is an old photograph showed how young girls learned to weave narrow bands.  As their skill in weaving improved wider more complex patterns would be woven.

using a backstrap to weave narrow bands


I loved this photograph as this is the way weavers in my workshops attach themselves to tables in order to use a backstrap and a heddle. These girls are using a stick with heddles which is a more time consuming method to weave narrow bands but it is very versatile.


However, you do not need to weave attached to a table.  This lovely photograph from the 1960's shows two Lithuanian girls weaving using only their legs to tension the warp. They are using a circular warp.


Weaving outside

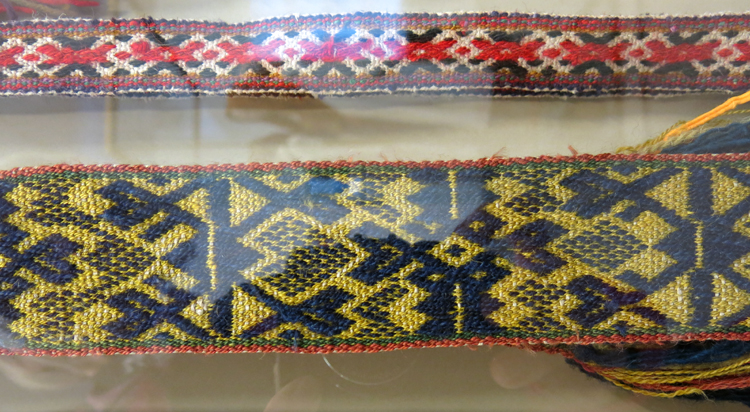
The museum had many old sashes and bands on display. I loved the range of colours used. Here is an unusual yellow and blue belt.


It is sometimes not easy to find books about weaving in other countries.

I found one lovely book which was published in 20010 by Inga Neniene. It is in Lithuanian but has a short summary of the contents in English.  With 431 pages it is quite a tome.

ISBN 978-9955-25-883-4
It is about Zanavykai weave traditions and textile heritage from the 19th century to the 21st century. It has many pages of weave patterns, both pattern drafts and actual photographs of textiles.  Here is an example.  Bedspreads using overshot patterns were very common.

an example of the many pattern drafts


some of the beautiful woven textiles
 There is also a section about band patterns. Unfortunately, I could not find the information about what colours would have been used for the patterns.
 A sample page of band patterns
However, in the English summary there is information about the use of sashes and the patterns. As in Sweden, sashes were sometimes sewn together to form a covering or even a carpet.
Mourning sashes were woven in white, black and unbleached linen. Sashes for souvenirs for special occasions were also woven with texts. Here are two examples. 


The author says that during her research she did not find any weaving women apart from one sash weaver. The last weavers had dismantled their looms in 2002 - 2003.  This lovely book is helping to preserve their tradition and also present their striking patterns to a wider audience. Even if, like me, you do not understand Lithuanian, the pictures and diagrams tell their own story.


However, if you are intrigued by Lithuanian weaving as I was, then do take a look at this book by Kati Reeder Meek published in 2000.

Reflections from a Flaxen Past:  For Love of Lithuanian Weaving.

ISBN 0 9700648-0-2

It is a treasure trove of images and patterns.  There is a useful introduction about Lithuanian history and then an awe inspiring collection of old black and white photographs of the process of turning flax into cloth from the M.K. Ciurlionis Museum.

  • There is a gallery of Lithuanians who love their countries textiles illustrated with many colour photographs.  Costumes and their details are intriguing. 
  • There is a comprehensive description of how to construct a simple sash loom and patterns of sashes to weave using it. 
  • Embroidery and patterned cloth weaving are also included. 

It is a glorious celebration of the delights of Lithuanian weaving and, of course, it is in English.

I asked Kati if I could reproduce a couple of pages of the book.  One page, page 71, celebrates the variety of ways of weaving. I have split the page into three sections so that you can see the looms detail.

 What an amazing collection of looms!

Types of looms used in Lithuania.


I have never seen a punch card system used on a small loom.  The circular variety is wonderful.

Does anyone know if this type of loom is still used or, even better, still available?


This page is typical of the detail that Kati provides about  Lithuanian spinning and weaving. There are further looms illustrated and described in the book.

Another page from her book.


She gives detailed instructions about weaving narrow bands on a home made loom.  Here is another page from her book, page 133.
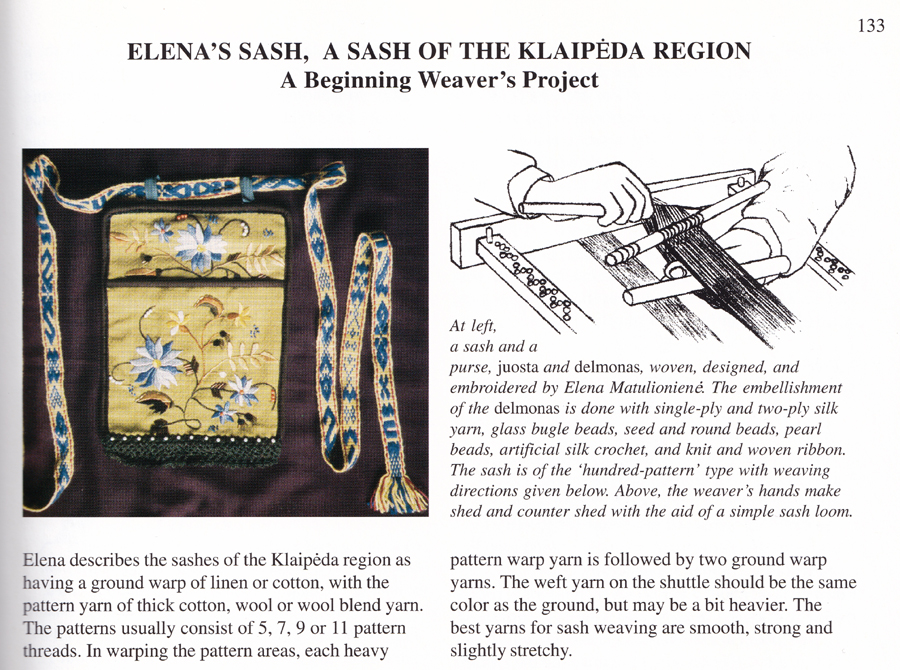


There are detailed instructions for using this type of simply equipment on the next few pages.  She calls it her 'desk drawer loom.'  It is a weaving hobby which can be stored in a shoe box - no bulky equipment required yet lovely patterned bands ca be made.

All in all this book is a treasure and is so obviously as a result of the deep love of Lithuanian spinning and weaving.

She has also published a second book which is for the specialist weaver. I have a large loom and to wind on a warp I require the help of my husband who, over the years, has become very familiar with the specialist terminology of weaving. Kati describes a method of winding on a warp which does not require a helper. I am intrigued by the method but I fear that my own weaving room is not large enough to be able to move my loom into a position where a trapeze like this could be used. Anything that makes the weavers task easier is wonderful and I am sure that there are loom owners who will find this method ideal.

ISBN 978-0-9700648-1-3

How to buy these books.

Both books are available from the USA from VavStuga.  http://www.vavstuga.com/

The book Warp with a Trapeze is available from Handweavers Studio in the UK. They have an amazing selection of books about weaving.  https://www.handweavers.co.uk/

I hoped you have enjoyed this celebration of Lithuanian weaving.  I loved the country when we visited it in 2017.  Do check out my previous blog for November 2017.
Here is the link.  https://durhamweaver64.blogspot.com/2017/11/

Happy Weaving

Susan J Foulkes  June 2019

Saturday, 1 June 2019

Handtowel in 8 shaft point twill

Cottolin Handtowel 

If you follow my blog, you will realise that I love weaving towels.

Cottolin is great for tea towels but is also very hard wearing and absorbent for handtowels. Here is a pattern for towels that i finished last month.

Warp: cottolin in dark blue, light blue, white and natural
Weft: natural cottolin

Sett: 24 dpi

Weave structure: Point twill on 8 shafts.  I used an extra shaft for the selvedge but a floating thread for the selvedge is fine.

Please note that using the point twill structure the colour stripes do not line up with the twill.  I like this as it seems to add a dynamic quality to the design.

Warp 

Dark blue     16         12            12         12            12                Central blue section can be adjusted.
Natural                20                         16                          20         I used 152 ends.
White                              2     2                   2      2
Pale blue                             4                           4


You can adjust how wide you wish the handtowel to be by altering the central dark blue section.

I used 152 ends for the centre section.  This is shown on the Weave Drawdown in turquoise blue although fewer ends are shown so that the pattern will fit onto the page.
You can use as many dark blue threads as you wish for the centre area depending upon your chosen overall width of the hand towel. The sett is 24 epi so you will need to count how many warp ends you want in the dark blue.

Total number of warp ends: 424

Weave Drawdown


eight shaft point twill


Before washing                                      After washing

Width:   17.5 inches     44.4 cm                        Width: 16 inches  40.6 cm

This pattern uses a single colour in the weft.  The length of the handtowel can be adjusted easily.
Remember to weave the first and the last 10 picks in 16/2 cotton.  This will make the hem less bulky.


Close up  of the pattern.


Here is a close up of the two striped areas.  As you can see the point twill is off set in one area.  This adds an extra dynamic to the design although I have to admit that it was a mistake. I meant to have both sides of the towel in a regular twill. You can see the difference in the striped patterns on both sides.


The full pattern showing the difference in the striped areas on the left and right. 


The centre dark blue area can be as wide as you wish.

Hanging tag

As usual I wove a hanging tag in cottolin using the same colours as the handtowel.

Here is the pattern.


Warp for hanging tags

Dark blue      6                      6
White                2               2
Pale blue               4       4
Natural                      4

Total number of warp ends: 30
Weft: dark blue

Width of hanging tag: 11mm


woven band and hanging tag


Here is the finished towel alongside a tea towel hanging up in my kitchen.


Happy Weaving!

Susan J Foulkes  1st June 2019

Wednesday, 1 May 2019

A new band weaving book


I have just received a copy of this lovely new book about band weaving.  I met Annie in Tacoma in 2016 at the International Braids Conference. Her blog is a real inspiration to anyone who enjoys weaving narrow bands.  http://aspinnerweaver.blogspot.com/


Her enthusiasm for inkle weaving is infectious. The book has over 100 patterns in the  most glorious colour combinations for 39, 59 and 79 warp threads. I could hardly wait to try one of her patterns.  The layout of the book is very user friendly and the patterns are large and clear to read.  Here is the pattern that I wove. It is number 11 in the book.  I asked Annie if I could put a picture of her drawdown on my blog, so here it is.

It is a pattern for 39 warp ends.  The two rows on the top show the warp threading: the pattern draft.  You can work out very easily how many threads you will need of each colour.  The top row are the heddled threads for an inkle loom and the bottom row shows the unheddled threads.

The rows below are the drawdown which is a picture of the final woven band.

Here is the band that I wove. I used Rowan cotton glace, a thick, shiny cotton, that  weaves beautifully.  I use it for guitar straps as it comes in a range of colours and is very sturdy. I use Annies guitar strap fittings for the straps from her Etsy shop.   You can see how useful they are when you compare it to the actual band that I wove.


Actual woven band
                     

close up of drawdown in Annie's book


The band is 1 inch (2.5 cm) in width. There are 39 warp ends.

You can see how the drawdown
illustrates the woven band very clearly.

All of the patterns in the book are clear and
enticing.

What will be my next choice? There are so many to choose from.


Annie's book gives lots of useful advice about colour and colour combinations. This is a real strength of the book. You will be rushing to the nearest yarn store to buy some colourful yarns.  Her own designs are inspirational.
It is always a thrill to find new books about the craft of band weaving. Annie has been weaving for many years and her creativity shows through in this lovely addition to any weavers bookshelf.

The book is available from her Etsy shop at        https://www.etsy.com/shop/ASpinnerWeaver                                     
A PDF version is due out soon.

Recently I was contacted by a weaver who has become interested in band weaving. Lynne has two small band looms. She allowed me to use her pictures here.


One is a Norwegian cradle loom,bought last year from Vesterheim,the National Norwegian-American museum and heritage centre. The other is a home made tape loom made from an old Port box! It measures 91/2” by 4” by 41/2” high. Lynne managed to put a 6 foot warp on it. The pattern is from Annie MacHale's blog. Once you have caught the bug for weaving bands it is amazing how creative you can be.

Annie uses an inkle loom but there are many ways of weaving these bands.

Here is my YouTube video: Five Ways of Weaving Narrow Bandshttps://youtu.be/ZzhuDomPtxE

My own book on narrow bands is The Art of Simple Band Weaving

https://www.blurb.co.uk/b/6375234-the-art-of-simple-band-weaving

In the UK, the Handweavers Studio sells a wonderful range of yarns which are excellent for band weaving.  Their yarns come in small quantities so that you do not need to buy a lot of yarn in one colour. I am sure that other craft stores in the

The Woolery in Kentucky has a lovely colourful selection of yarns. https://woolery.com/about-us/

They invited me to write a guest blog recently which was a great honour.

https://thewooleryguy.wordpress.com/2018/10/17/guest-post-weaving-patterned-bands-with-susan-j-foulkes/

Happy Weaving

Susan J Foulkes  May 2019


Monday, 1 April 2019

Weaving Letters


Weaving letters with 13 pattern threads


In a previous blog in June 2018, I posted the pattern charts for the letters with 13 pattern threads. Here is the link to the blog post. https://durhamweaver64.blogspot.com/2018/06/derbyshire-guild-workshop.html

Weaving letters and making your own messages is fun. Recently I was asked to weave six sashes for the Journal for Weavers, Spinners and Dyers. https://journalwsd.org.uk/

However, I needed to check that the wording would be the correct length for the sash so I had to weave several samples. Because the design was complicated I used my 32 shaft Megado loom to weave the sashes.

The First Sample

My first sample was too long. I needed to weave the legend 'The Journal for Weavers, Spinners and Dyers' twice so that when the sash is worn, it can be read from the front and back  For this sample I used 6/2 cotton and it was too long and too wide.


The Second Sample

I tried a thinner cotton and came up with this design.


I only wove one repeat of the lettering so that I could check the length. This seemed correct.
I chose the colour in the border area to represent dyeing and the red twist on either side of the lettering to represent spinning. The fancy heart pattern will be the centre section which will be on the shoulder of the wearer.

The Third Sample

The sash still seemed a little wide so for the third sample I reduced the white area.


I sent all the samples to the committee so that they could comment and see if they liked the design.  One aspect that I should have foreseen was how clear the letters looked at a distance.  I had been so busy with weaving and looking closely at the sashes, I had not considered how easy it would be to read the message from a distance.  I was given some useful suggestions and went about redesigning some of the letters.

Final version


6 sashes showing the centre section


Here are the final versions.  I do hope that they are useful. I am looking forward to seeing a photograph of the sashes in use.

Do have a go at weaving letters and making your own messages.  Using the 13 Sunna double slotted heddle, weaving letters is much easier than using an inkle loom.


For weavers in the UK, the 13 pattern slot Sunna heddle is available from the Handweavers Studio.   
https://www.handweavers.co.uk/equipment-weaving-looms-rigid-heddle-stoorstalka.irc

Susan J Foulkes  April 2019.

Friday, 1 March 2019

Bath mats in double weave 2


This wonderful illustrated book is an inspiration for any weaver to try double weave. It is a timeless classic.

Double weave on Four to Eight Shafts by Ursina Arn-Grischott.
Published by Interweave Press in 1999.  ISBN 1-883010-74-8

Using a double weave pattern with two blocks gives more flexibility to design.

Bath Mats

Warp and Weft: 2/3 cotton set at 10 epi for each layer

A double warp is used therefore sett at 20 epi.
Twelve shafts are needed for this pattern. There are three blocks

Warp


Black   16   60   12   60   12   60   16
White   16   60   12   60   12   60   16


Here is the drawdown. I simplified the drawdown so that you can see the blocks clearly.  For each square the number of threads is 60 white and 60 black so 120 heddles are needed. In the diagram only 24 warp ends are shown.  For the space in between each block 32 heddles are needed but only only 4 are shown. This makes the diagram smaller so that it will fit onto the page and you can see the threading and treadling clearly.

From the diagram you can work out which treadling to use for different effects.  If you want all white on the surface and black on the reverse use treadling 1 - 4.

If you want all black on the front and all white on the reverse use treadling 13 - 16.

For each of the two blocks you can use the correct four treadles to place the block.


Drawdown showing possible treadling order to produce different effects. 

 You can vary the pattern in many ways.

Warp

When making the warp, use a strand of white and a strand of black for each group.  The white and black ends are threaded as shown. The black ends are threaded through the odd numbered shafts and the white ends are on the even numbered shafts.

Weft

Note that the weft is alternately white and black. Two shuttles are required.


I wove two mats.  The width was 23.6 however with double weave and cotton this will shrink considerably.

Generous allowances were made for take up and ends of the mats.


Two mats 

Here is a closer look at one of the mats.

One side of the mat


the reverse side of the mat

Here you can see the two sides of the mats. I deliberately varied the height of the 'squares' as it is difficult to end up with an exact square in double weave. I counted how many weft throws for each square. You can alter this to  make your own variation. The  warp and weft shrink when off the loom and washed.

To start and end the mats I used a thinner cotton yarn to weave 12 picks in plain weave in the same colour as the warp.  This ensured that I could turn in the hem to the inside of the mat without adding too much extra thickness.

Here is a close up of the hem. I think that it is neat.


The second mat is shorter and I used a different size of square in the pattern.

Black dominant on one side

As you can see at the selvedges, it is difficult to keep the black and white from showing. The two wefts should be twisted around each other so that the edge is as neat as possible. 


White dominant on the reverse side

I enjoy double weave but it is time consuming both the warp and weave. I have only used thicker threads. One day I will try a pattern with fine silk.

Double faced Rugs

When I first started to weave, I quickly became fascinated by rug weaving. I wove a simple rug but I wanted something more creative.  Double faced rugs are amazing.  Here is one that I wove many years ago and is still in use in the lounge.

It is a heavy rug as it is effectively two rugs on top of each other. Double weave produces very sturdy fabric.


For obvious reasons I called it my rainbow rug.

Here is the reverse side.

Two surfaces of the rug. 


Peter Collingwoods classic book on rug weaving was my inspiration.  Unfortunately, I found rug weaving too physically demanding and had to sell my sturdy Finnish Toika 8 shaft loom. The final item I wove was another double weave rug in blue which is carefully packed away.  I did not finish the edges at either end so when I decide that I want to use this rug I can decide upon the type of edging I would like.  For the rainbow rug, I used one of Peter Collingwoods ideas for no plaited ends.  This involved weaving each linen warp end back into the rug as the knots were made along the edge.  The ends are very neat and have no awkward plaits but as you can see, the linen shows through on the final navy stripe.

 I have used many of Peters designs for finishing the ends of rugs.  They are very time consuming to do and I remember one which took longer to do than weaving the actual rug!

I particularly liked the effect of weaving the date at the end of the rug using a second colour of linen warp thread.  Peters book is such an inspiration.


Happy Weaving

Susan J Foulkes  March 2019