I submitted a project about Stash Busting and it was accepted. My project was weaving tea towels using up small quantities of yarn. I am sure that all weavers have a stash which needs reducing. Here are my tea towels, beautifully photographed by Handwoven. (permission was given to use this image).
 |
| Stash busting tea towels. Handwoven Jan 2022 |
My previous submission was Nov/Dec 2014, Vol 172, no 5, pages 66 - 68. The Heart of the Swedish Band Weaving Tradition. My Baltic heart tea towel has been very popular. These project details are available as a download at:
https://shop.longthreadmedia.com/products/baltic-hearts-tea-towels
Using a multi-shaft loom to weave patterned bands.
You can weave narrow bands on a table loom or a floor loom with eight or more shafts.
The advantages of using a multishaft loom are:
- You can weave more complicated patterns with greater ease.
- You can weave longer bands.
- The weaving is tighter because the tension is greater.
- You can use very fine threads which would be very difficult to use with a back strap.
- You can use pattern threads similar in colour to the background, which can be difficult to see.
To help you design or copy bands I have used the Fiberworks PCW weave program. You will need to adapt the following instructions if you use a different program.
1. The Threading Draft
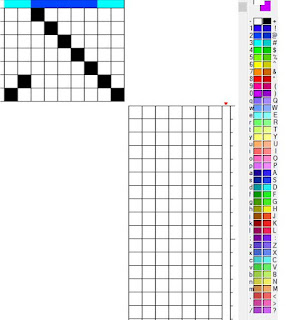
First set up the program so that it is in lift plan mode as the patterns are designed in the lift plan. I set it to 7 shafts. There are five pattern threads for this band. The warp pattern threads are in dark blue colour. The four border threads are in pale blue. I changed the colour of the weft to white.
The full threading pattern shows the background threads and border threads and the two background threads in between each pattern thread. It is important that the two background threads in between each pattern thread are threaded in the correct order. A pattern thread on a odd numbered shaft has a background thread on each side on shaft 2. A pattern thread on an even numbered shaft has a background thread on each side of it threaded on shaft 1. This is known as the Baltic threading and produces a crisp pattern on the front of the band and a crisp pattern in reverse on the back.
It is easier to plan your design using only the pattern threads and four border threads showing.
3. Using the Lift Plan
You can now start to put in your pattern on the lift plan. I have coloured the centre pattern thread red. The first two columns are plain weave for the background and border threads. Leave these columns blank until the end.
This pattern is for the Sámi band. I have copied this pattern into the lift plan. All patterns must repeat over an even number of picks. The plain weave lifts have not yet been added. Only the pattern is shown on the treadling.
4. Adding Plain Weave
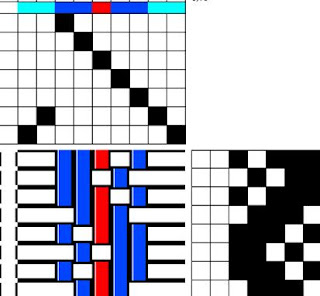
The next stage is to put in the plain weave for the background and border. For this you need to examine the centre thread of the pattern. In this case it is on shaft 5. I have coloured it red. Look for the section when it is raised over three threads.
When weaving with a rigid heddle, the centre thread is always threaded through the centre hole. The background threads next to it are threaded through the slots. So, if this pattern thread is on an odd numbered shaft, the first pick raised over three threads should also raise the background threads on shaft 1. This means that the background thread on shaft 2 which is on each side of the pattern thread will be lowered. This covers the background thread underneath so it does not show on the reverse side of the band. You can now fill in the plain weave.
It is important to add the plain weave in the correct order. These are filled in down the left side of the treadling.
Here the plain weave has been added to the treadling.
This is the full drawdown. The treadling repeat is eight rows. The top row is the first and represents lifting shafts 1 3 5 6 7
The second pick lifts shafts 2 4 6 7
5. Check the pattern repeat
The final check is to ensure that you have a correct pattern repeat. Go to the weft button and repeat the pattern. If the pattern is regular you know that your pattern repeat is correct. The plain weave border threads are in pale blue. The centre of the pattern threads has been coloured red. The treadling now shows two pattern repeats.
7. Weaving: more than eight shafts
If you have up to eight shafts available, you can weave all five thread patterns (symmetrical and asymmetrical) and seven and nine thread symmetrical patterns.
For seven and nine thread symmetrical patterns, you will need to use a point draft. Asymmetrical patterns for 7 and 9 pattern threads require a straight draw on 9 or 11 shafts.
Sashes
In 2018 I was commissioned to weave a set of six sashes for the Journal for Weavers, Spinners and Dyers. I used my 32 shaft Megado loom. Here is one sash in the process of being woven. This complex piece of weaving would have been extremely difficult to produce using a heddle.
Do check out my blog for April 2019 for details.
I have woven a small banner for the International Conference in Denmark in 2022. These letters have thirteen pattern threads.
Nordic and World Braids and Bands 2022
August 14-19, Svendborg, Denmark
5th International Conference on Braiding
The information about this wonderful conference is now available at https://thebraidsociety.wildapricot.org/Braids-2022
Do check out the details of the two workshops I will be taking on my blog.
A happy and peaceful 2022 to everyone.
with very best wishes
Susan J Foulkes January 2022


