Threading the rigid heddle
I make a warp with a singles cross in the same way as I make a warp for my floor loom. I put the cross sticks through the singles cross which means that the warp is in threading order.
Having a stand in which to support the heddle at an angle is very useful. I use a mobile phone stand which I bought in IKEA.

I use a drawdown to check the warping order. This pattern is from my book The Art of Simple Band Weaving which is published by blurb.com. This book has many designs using different threads and widths.
The first 15 patterns show the weaving effects that can be made by altering the warp order from simple stripes, off set ladder, bead, off set 1:2 stripe etc. There are 114 other designs as well as suggestions for how designs can be altered and created. The band is very sturdy and was easy to weave with a backstrap. Only the centre row of holes is used.
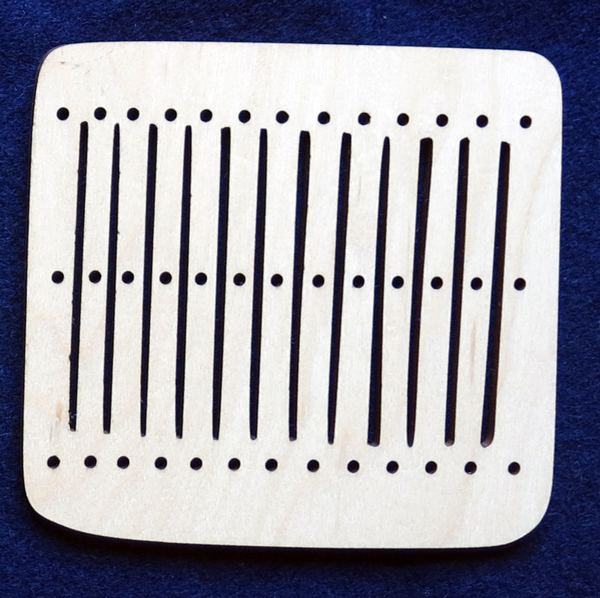


Narrow rigid heddles only use a small number of warp ends for the narrow band. The original pattern had 29 warp ends in double knit cotton which produced a band of 20mm in width.
I only needed 25 warp ends for this heddle. I took off the two red warp ends at each side which left 25 warp ends. This gave a weaving width of about 14 mm. Of course widths are not exact as you can pull in the warp ends very tightly or leave them a bit looser and still cover the weft.

Weaving this band was useful as it gave me a chance to feel the heddle in action.
I also tried using just the centre holes and slots in the narrow heddle.

This band has four blue threads in the slots and three pattern threads in the centre holes. There are seven warp ends in total.
Using the two rows of additional holes.
I wanted to try using the additional rows of holes in the two heddles which I got from Robin. His ETSY site is thedancinggoats.
These two heddles were inspired by the Bryggen heddle from Bergen in Norway.
 |
| The wider version of the Bryggen heddle. |
 |
| Two versions of the original heddle. |
Using the wider Bryggen heddle.
I started by threading the wider heddle using two rows of holes.

In this diagram, E means that there are no threads in this hole or slot.
The red and white warp ends float over one pick. The pattern is relatively neat on both sides of the woven band.
The weaving sequence is:
Pick one: raise the heddle. As you put the shuttle through the shed, pick up the five white threads in order with the blue warp end in between. These will form part of the under layer with all the blue threads in the slots. In fact the white threads will be hidden in the centre of the woven band.
The red threads remain on top.
Pick 2: lower the heddle. As you put the shuttle through drop down the five red threads in order with the blue warp thread in the slot, in between. These will be hidden in the centre of the woven band. The white threads remain on the reverse.
Alternating these two picks will produce a horizontal stripe of red threads on the top of the band and a horizontal strip of white threads on the reverse.
The pattern threads rest closely together and float over one pick.
 |
| Red floats on the top of woven band |
 |
| White floats on the reverse side of the band |
Alternating these two picks will produce a horizontal stripe of red threads on the top of the band and a horizontal strip of white threads on the reverse. This is shown on the photographs.
Using the original size version.
The miniature version of the heddle is the actual size of the archaeological find. The original was made from elk antler and it thought to date from 1228 - 1332. An earlier heddle made of pine which does not have these additional rows of holes dates from 1170 - 1198.
Warp 1
Here is the threading chart.

There are 7 blue warp ends in the center holes and slots. There are 3 red ends in the top row of holes and 3 blue ends in the bottom row of holes.
16 warp ends in total.
The weft is white and the weave structure is warp-faced plain weave. I used dk cotton for this band for warp and weft.
Lower the heddle
 |
| Lower the heddle |
Raise the heddle
 |
| Raise the heddle |
You can see how there are two layers close together when raising or lowering the heddle.
I found weaving with the small version very difficult. I tried the weaving sequence of two picks like the wider version. However, I could not achieve a neat band. There does not seem to be enough background threads to make a solid foundation for the pattern threads.
I tried a four pick sequence so that the pattern threads float over three picks.
Weave Sequence.
1: Raise the heddle. The weft goes through the shed with the white pattern threads and red background threads on top and the blue pattern threads and the red background threads in the centre hole on the bottom.
2: Lower the heddle. The weft goes through the shed with the white pattern threads and the red background threads through the centre hole on top and the blue pattern threads and the red background threads through the slots on the bottom.
3: Raise the heddle. The white pattern threads and the red background threads in the slots are on top. You need to select each white pattern thread and bring it under the red background threads. You can see that the pattern threads are offset between the slots. It is easy to select the correct pattern thread so that it goes between the appropriate two red background threads.
4: Lower the heddle: The white pattern threads and the red background threads in the centre holes are on top. The blue pattern threads need to be selected in turn to go between the adjacent red background threads in the slots.
Pattern.
The finished band will have the white pattern threads on top and the blue pattern threads underneath. The pattern threads float over three picks and then are hidden in the centre of the band.
 |
| White ends on top of band |
 |
| Blue ends on reverse side of band |
I decided to try an extended weaving sequence where the warp ends in the top and bottom row of holes each float over three picks. Even with this sequence, I found it hard to get and even beat and have the pattern threads move close together.
Warp 2.
I was not happy with this band so I tried a different warp. This time in a thicker wool.
 |
| The threaded heddle |
Here is the threading chart.

My attempt was slightly better with the wool version. However, the two pick weaving sequence was still unsatisfactory.
I tried the four pick sequence where the top and bottom rows of pattern threads float over three picks. This produced a better looking band. However, I will need to practice to improve the even beat. The band is very chunky because of the four layers.
I took this heddle to my Guild meeting in November and experimented with the band .
 |
| At the Guild meeting |
Close up of the woven band.

I found weaving with the small heddle a challenge. I was unhappy with the way the pattern threads do not lie close together and the pattern thread from the bottom shows through slightly. I will need to practice with this heddle to see if I can achieve a neater weave. If you have any hints let me know!
Here is a YouTube video from Robin about this heddle.
Weaving bands with the Bryggen configuration
He has a YouTube channel and the video he made about this heddle is Bryggen Heddle Pick Up Threads.
POSTSCRIPT
I realised that I had not included the weaving instructions for the Bryggen heddle. Here are two charts which indicate the sequence.

This chart shows what is happening when you raise and lower the heddle.
The next chart indicates when the pattern threads should be picked u or pushed down. The weaving sequence is four picks.

The column on the shuttle action indicates whether the pattern threads are left in place or picked up or pushed down.
Basically for this weave sequence the pattern threads, top and bottom layer, float over three picks and are then secured in the centre of the band.
The top pattern threads a are pushed down in between the background threads in the slots.
The bottom b pattern threads will be picked up through the four background threads and secured in the centre of the band.
I am intending to do a short YouTube video of the sequence as it is much easier to see than describe.
Seasons Greetings and happy weaving
Susan J Foulkes December 2024


